At a recent sumptuous Italian dinner, the conversation turned to survival food, ironic as that may seem. My ‘Sea-Kayaking-Guide’ son and our ‘Recently Graduated Engineer’ friend were discussing the needs of back-country adventurers and novice-cooking singles for nutrient-dense, healthy, tasty, budget friendly, easy to prepare food. Falafel quickly jumped to the top of the list, as a way to add protein to a sandwich or salad.
Falafel are Egypt’s street-food gift to the world. Even though I have read a lot, and “eaten around” quite a bit, falafel are not part of my family’s food vocabulary. Always up for a challenge, I set off on a little adventure of my own, chasing recipes, and working toward a falafel recipe that will feed a solo diner or a party group, with management of leftovers and big-batch cooking as sidebar issues.
I have “test-driven” falafel with Carmaine’s high school classes on a couple of occasions, with great success. Some of the kids have had them before, but for others this is a completely new food. As I may have mentioned before, if the kids make the food themselves, they are much more likely to try it (and like it) than if it’s just presented to them in completed form. I was the same way. A painfully picky eater as a child, my list of “acceptable” foods expanded the more I learned to cook. That fact that falafel resemble chicken nuggets is not lost on me — anything with a lovely crispy exterior and a garlic-y flavor is bound to please. I like them best piping hot, but they also work in a room temperature sandwich. They’re just as safe to pack as any sandwich for a school lunch or picnic treat. In the back country, they can be made with chick pea flour and dehydrated ingredients.
Win, win, win! Dress them up any way you like — I’m pretty sure you’ll find them “acceptable” too.
Falafel
It became very clear early on in my research that the basic falafel mixture is simply a matrix for all kinds of flavor options. Here are the essential ingredients for a mildly-spiced basic mix — merely a springboard for experimentation. Not all recipes use baking powder, but I liked the final texture better when it was included.
Ingredients:
2 cups well-drained cooked chickpeas, more or less (one 19-ounce can, or cook your own)
1 egg (if you need a vegan recipe, use 1 Tbsp vegetable oil – an option, NOT a perfect substitution)
1 tsp Lemon juice
2 Tbsp flour (gluten-free flour blend works fine)
½ tsp Baking powder
1 tsp Seasoned Salt (brand of your choice)
1 tsp dry herb blend with garlic
½ tsp ground cumin
½ tsp ground coriander
½ tsp paprika
¼ tsp cayenne
¼ tsp black pepper


Flavor options:
Most recipes call for fresh garlic, some kind of onion, parsley and cilantro*, and if you have those on hand, or want those fresh flavors, go right ahead. Chop them well if working without a food processor; otherwise, chop them roughly and add them in right while you’re processing the beans. It’s all to taste, but I would stop at about ¼ cup of onion, and 1/4 cup each un-chopped parsley and/or cilantro (stems can be included).
Beyond that, there are no rules – the falafel police won’t come to charge you if you add your favorite flavors. We even experimented with stuffed falafel, forming the patties around little pieces of cheese. Cayenne is the default, but I like hot sauce and smoked paprika. You could go Mediterranean – black olives, sun-dried tomatoes, roasted red peppers, and dry-pack feta cheese right in the mix (in fact, those were my favorite on testing day).
Be aware that you may need to add a bit more flour if you add wet ingredients (like hot sauce or roasted red peppers). Keep that play-dough texture.

Did you know that coriander and cilantro come from the same plant? Ground coriander comes from the seeds, and cilantro is the fresh leaves and stems. Ground coriander starts to lose its flavor pretty quickly. With all spices, it’s best to buy whole seeds or berries or whatever, toast and grind them yourself. “Best”, I say, but not easiest. Just a reminder to buy ground spices in small quantities, and give them the pitch if they’ve been around for a year. Store them cool, dark and dry, or airtight in the freezer, especially if you’re an occasional cook.
Preparation Methods:
Again, there are choices. You can warm up the chickpeas in their juice, then drain them and rinse them with warm water, and mash them with a fork. This takes patience and muscles.
I prefer to use a food processor.
My mother used to use her electric mixer to mash potatoes (never recommended), and to cut butter into flour for pastry, so it’s a proven multi-tasker. Actually, it only works if the chickpeas are hot, and it works much better after you add the egg. It wouldn’t be my first choice, but it’s faster than a fork!
I don’t think a Magic Bullet is going to get the job done. Even with a real blender you’d have to work in small batches. A hand blender (also called an immersion blender) would work fine, because you can plunge it up and down to mix everything together.
Some folks like a smooth-textured base mix; others prefer a chunky blend. Regardless of your hardware, here’s the drill: Render the chickpeas mashed to your liking, which is easier if they’re hot.


Mix in the lemon juice and egg (or oil).
Add all the seasonings. Mix well.
Mix in the baking powder, and 1 Tbsp of the flour. Stir well. Add the remaining Tbsp of flour as needed. You want a texture that will hold together, neither too soft nor too dry.
If your mixture is too dry, add water, or additional lemon juice until it works, or a teaspoon or so of oil if you didn’t use it in place of the egg. If your mixture is too wet, add flour until it’s just right. Don’t overdo – the mixture may firm up after a rest.
Set it aside in the fridge for half an hour or so. Seems like a nuisance, I know, but it takes time for the flour to absorb moisture, and I suspect it forms a little gluten while it’s resting, which helps with the texture. I tried not-resting vs. resting, and resting is better. If you are using gluten-free flour, check the texture after resting — you may need to add a little more.


Form into 2 Tbsp patties.
The shape of falafel is traditional – there’s even a special tool for forming them (not the portion scoop shown here). I think those little patties were designed to give the perfect ratio of crunchy exterior to soft interior. There is nothing to stop you from making a falafel “roll”, about the size of a hot-dog, if you think that would make a better wrap or hoagie-filler.
Some recipes on the internet suggest breading the patties, dipping them in flour, then egg-wash, then seasoned breadcrumbs. I wouldn’t bother. Pressing them in sesame seeds sounded like a good idea, so we tried that as an option, with great success.


Cooking choices:
You can pan-fry falafel using a little oil, or a 50/50 mix of butter and oil (the oil prevents the butter from burning too quickly, and I like the flavor), until they are nicely browned and crispy on both sides. Use medium heat so they cook through as they brown – remember there’s egg in there. In my opinion, this is the best option.


You can shallow-fry falafel in vegetable oil (not olive oil – it smokes at frying temperature). Shallow frying involves heating about half an inch of oil in a pretty deep frying pan on medium-high heat for about 3 minutes, until a little test bit of falafel mix sizzles immediately upon entry.
Fry falafel, turning once, until they are crispy-crunchy-golden-munchy (not long – watch carefully to prevent burning).


Remove falafel from the oil with a lifter or tongs, and drain on paper toweling.
Shallow-frying creates a lovely exterior texture. The downside is that it involves more mess and probably more calories than pan-frying. Also, you have to dispose of the used oil. Better texture; big cleanup – you choose.
You can deep-fry falafel if you keep a deep fryer up and running, or just love the big mess and potential danger of deep frying in a pot on the stove. I don’t. It’s less messy than shallow-frying, but uses more oil, which you either have to filter and re-use, or throw out. Choices, choices, choices. I leave deep-frying to commercial kitchens.

You can bake the patties in a 400°F oven (toaster or regular). Coat them with oil on both sides first, and put them on a piece of non-stick foil (the best invention since sliced bread for the dishwashing-averse). Regular foil would be fine, but falafel may stick a little. Baking results in a satisfactory crunchy exterior (not as perfect as shallow-frying or pan-frying, though).
This is the best way to cook up a few frozen falafel after work while you check your email and call a friend. Twenty minutes of baking for frozen patties, about 12 minutes for fresh or thawed falafel. This is definitely the least messy alternative, with a satisfactory (if not perfect) outcome.


Serving Options:
You’re going to want some kind of sauce. Tzatziki works very well. Carter likes steak sauce. Traditionally, you would use tahini sauce. Tahini is sesame seed paste. Unless you’re a foodie, or you’ve been cooking with it all your life, your tahini (like mine) may be sitting rancid in the fridge because you over-bought it for that party last year and haven’t touched it since. Make a flavored yogurt sauce instead. Here are two options:
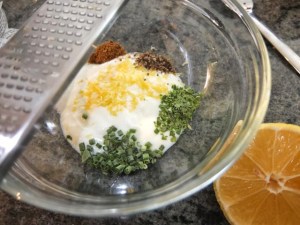
Yogurt sauce: Flavor some nice, thick yogurt with lemon juice and zest, and a pinch each of cumin, salt and pepper. Additional finely-chopped fresh herbs, such as parsley, cilantro, dill, or mint are all wonderful. Dried herbs work just as well, if you give them a few minutes to rehydrate in the yogurt and re-develop their flavors. Garlic is always an option (how about some of that roasted garlic you have stowed in the freezer?) Hot sauce is never mentioned, but some of us put that *stuff* on everything.
Tahini sauce: For a small batch, put ¼ cup tahini, 1 clove of garlic, ¼ tsp salt, 1 Tbsp olive oil, 2 Tbsp lemon juice and a couple of sprigs of parsley in a blender (Magic Bullet works great for this). Buzz until smooth. This is pretty basic – you could customize it any way you choose. Leftover tahini sauce can be kept in an airtight container in the fridge for at least a week. If it starts so smell bad, or like old used machine oil, it’s either rotten or rancid, so throw it out.
Falafel are a nice addition to a salad, an alternative to adding some chicken or shrimp or a hard-boiled egg.
Greens, tomato, cucumber and red onion seem to be the “usual suspects”, judging from an internet survey, but don’t limit your thinking. Clean out the crisper drawer, or do a little market-fresh shopping. Do you still have some oven-dried grape tomatoes? How about that zucchini?
…or…
You can chop up those same ingredients and stuff salad and falafel in a split half-pita, or roll them up in a whole warmed pita.


You could wrap everything up in a flour tortilla. You could make a lettuce wrap with a leaf of romaine!
You could put it all in a bun – falafel panini! Add sprouts, if you like them – there are lots of different kinds available now. Dill pickles add a nice schawarma touch. Work with whatever you have; just remember to add dressing of some sort. Ranch dressing works in a pinch. That dip with the feta cheese from my Roasted Red Peppers post would probably work splendidly. Cross cultures – add some sweet chili dipping sauce! Spread a little tapenade!


Falafel offers you a perfect opportunity for a party in your kitchen. Choose a few like-minded friends to share ideas, and the budget. On party night, make a double or triple batch of basic falafel mix. Divide it up, and let each cook give his or her portion a different flavor profile. Make your patties and freeze them on plastic wrap, holding back a few for taste-testing. Make a little sauce, make a little salad, warm up a little pita, fry off a couple of each flavor, and enjoy dinner. Share the cleanup! After dinner, divvy up the frozen falafel, bag and lable, and everybody goes home happy.






Leave A Comment