


If you ask a room full of people if they enjoy cooking, they will likely respond that they love to prepare for a dinner party or barbeque, but the drudgery of preparing daily meals bores them to tears. It’s so much easier to pick up a little something, whether it’s drive-through or deli, or all that wonderful “heat and eat” plunder waiting in its own section in the grocery store. When suppertime rolls around, my personal bug-bear is anything that requires me to boil a pot of water, which is why I keep single servings of rice, noodles and mashed potato in my freezer — a minute or two in the microwave and they’re ready to go. I invest one afternoon in food preparation, and I have my very own “heat and eat” waiting for me for up to three months, depending on how well I plan. I’m not good with left-overs — they often become the “body farm” of food, due to extended neglect at the back of my fridge. My method is to create “planned-overs”, to quote my friend and mentor, Sabrina delBen.
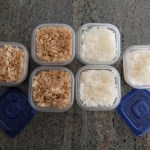

Microwaving a bit of veg, or assembling a small salad takes very little time, but cooking meat is a bigger project. I like to keep cooked chicken breasts in my freezer, individually wrapped, so I can protein-up that salad, or make a sandwich (hot or cold), or turn my frozen noodles into a stir-fry without making a big mess. Preparing a large number of chicken breasts is really easy — I do it on the same afternoon when I’m preparing the noodles, rice and potatoes. When everything is done, I don’t have to do any kind of big cooking for a couple of months at least. You really don’t need to invest in those pre-fab cooked chicken products, with their high sodium levels and preservatives, when you can make a better product yourself.
Here’s how.
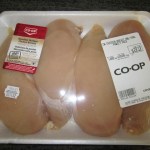
Start by purchasing at least four generously-sized chicken breasts, boneless and skinless. If your budget allows, buy a fresh, air-chilled product. Otherwise, you’re paying chicken prices for water. If you want to buy the big economy box of IQF (Individually Quick Frozen) chicken breasts, be aware that the word “enhanced” means they may have been soaked in, injected with, or tumbled with a solution that increases their sodium content and “tenderizes” them (to my palate, it renders them mushy).
Thaw frozen chicken overnight in the fridge, or thaw chicken breasts quickly, sealed in a zip-lock bag, submerged in warm to hot tap water, which should take less than 20 minutes if you keep them in a single layer. You weren’t supposed to do this in the olden days, but research has shown that it’s safe enough if you do it quickly. Thawing meat at room temperature on the kitchen counter is still considered unsafe — the meat spends too much time in the danger temperature zone, when bacteria can multiply at an alarming rate.

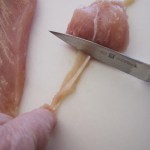
If they are present, remove “tenders” from chicken breasts. Usually you can just pull them away from the rest of the breast with your fingers. Tenders have a tendon running through them, which is edible, but tough. You can remove it as shown.
Save those tenders in a covered container in the fridge, or wrapped air-tight in the freezer, if they haven’t been frozen before. They’re particularly good for the “Crispy Chicken” option in the “Crispy Shrimp” posting. Alternatively, they make the best stir-fry.
By the way, it’s perfectly safe to re-freeze chicken once it’s been cooked. It is absolutely not recommended to re-freeze raw thawed chicken. If you thawed out too many pieces (perhaps because you over-estimated the capacity of your frying pan), cook and freeze the extra – DON’T just pop it back in the freezer. You probably won’t die, but the quality of the chicken will suffer, and you might be re-storing somewhat germy food.


Brining boneless skinless chicken will ensure it is juicy and well-seasoned when cooked. It’s easy, and doesn’t take very long. Make up a solution of 1 Tablespoon Kosher salt, or 1 1/2 teaspoons of table salt per cup of water, making enough brine to cover the chicken completely in a zipper-lock bag — 2 or 3 cups of brine is usually more than enough. Stir the brine really well to ensure the salt is dissolved, which is much less complicated than dissolving the salt in hot water and then cooling it with ice, but you could do that too. Put the bag in a bowl or a baking dish to prevent accidental spills or ruptures that require you to clean your entire fridge before going on.
Flavoring the brine with onion, herbs or spices might make you feel like you’re cooking, but it doesn’t really change the outcome much — that’s for lower salt/ longer brining time adventures. Brine the chicken in the fridge for half an hour or so, then rinse it and pat it dry before proceeding.
That “enhanced” chicken is pre-brined — you don’t have to do it twice. Rinse off the slimy liquid when you thaw it, and pat it dry.
Unless I’m smoking my chicken, I skip brining altogether and use my meat thermometer to tell me exactly when my chicken is done to perfection. I get excellent results in the “juiciness” department, without a whole lot of fuss. Even in a sauce, chicken breasts will become dry if you cook them past the magic internal temperature of 165°F. If you don’t own a meat thermometer, go out and buy one today! Your alternative is to keep cutting little slits in the thickest part of the chicken to see if it is no longer pink. Poking and squeezing isn’t going to tell you what you need to know. Chicken breasts come in all sizes, so time alone is not a good indicator of doneness.

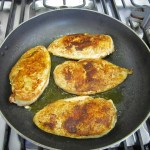
Only browned — Not cooked.

Now it’s done!
Get a meat thermometer! I mean it! Get an “instant read” one, or a probe one, and remember you get what you pay for — you’ll buy any number of cheap ones over time, but you’ll use a single, more expensive, good-quality one forever.
Marinating meat flavors the exterior, but does not truly tenderize it or enhance its juiciness. Marinating is messy and time consuming, and not really necessary. The surface of your chicken needs to be dry in order to brown well, so you would have to rub off the marinade or wet seasoning anyway for the best result.
Start seasoning simply, with salt and pepper. Then you can add the dry seasoning of your choice (like “poultry spice, or Chinese Five-Spice, or curry powder).
There are all kinds of pre-mixed dry rub products right there with the spices at the grocery store – use them if you like them, or are cramped for space to store individual spices. If you want to make your own, here’s a pretty basic mixture:
- 1 tsp salt
- ½ tsp pepper (some people like to use lemon pepper)
- 1 tsp onion powder (NOT onion salt)
- ½ tsp garlic powder (NOT garlic salt)
- 1 Tbsp paprika (hot, sweet or smoked – your choice)
- 1 Tbsp brown sugar (surprising, but remarkably good)
- 1 – 2 tsp cumin (if you’re not familiar, smell it first, and use the smaller amount)
- ¼ tsp cayenne pepper (go hotter at your own peril)
- Optional but good: ½ tsp dry mustard, 1 tsp dried oregano, ½ tsp ground ginger


You can make up a batch, use what you need, and keep the rest in a shaker or container in a cool dark place (not the fridge – it’s not really dry in there). I keep some of my spices in air-tight containers in the freezer to extend their lifespan, but mostly I try to buy small quantities, and I do a stoic, sincere cull once a year. If an herb or spice has lost its aroma, it probably has very little flavor left.
I feel compelled to mention that cleanliness really is next to godliness when it comes to handling raw chicken. Wash your hands before you start to handle it, and again immediately after you finish. Once you have the chicken seasoned to your liking, move it to a clean plate or baking sheet, pop it in the fridge, then take the time to wash down your knife, cutting board, counter, and anything else you touched (like those spice jars, or the fridge handle) with soapy water. You really don’t want the kind of bugs that grow in chicken juice hanging around your kitchen. Use some kind of utensil, tongs or a fork, to move the raw chicken around once it’s seasoned, and after it’s cooked.
Preheat the oven to 350°F. Do this first, because you don’t want to put your beautifully browned chicken into a cold oven, or worse, an oven heating itself by running its broiler element in addition to its baking element. It takes most ovens a good 15 minutes to properly pre-heat – file that nugget of information away before you bake your next batch of cookies.
Get out your largest frying pan, preferably one with a pretty heavy bottom. Make sure its handle is oven-safe to 350°F. Heat it up for a minute over medium-high heat. Add 2 Tbsp oil, and heat for a further minute, until the oil is shimmering.
Don’t panic over that oil quantity – a lot of it is still going to be in the pan when you’re finished.
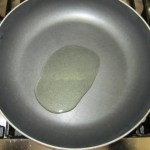
Cold pan, cold oil.

Now you’re cooking!
Add the chicken breasts, smooth side down. Do not crowd the pan, or the pieces will steam rather than brown, and browning is what you want. If you’re really interested in why, look up “Maillard reaction” — browning has nothing to do with “sealing in the juices” and everything to do with flavor. Do not flip or move the chicken for 2 minutes. Check to see if it’s nicely browned – if not, leave it alone until it is. Then, flip them over, and brown them for the same amount of time on Side 2.

If your frying pan can hold all the chicken, position your (possibly newly acquired) probe thermometer horizontally into the thickest part of one piece, and put the whole works in the pre-heated oven. Continue cooking until the internal temperature of the chicken at the thickest part of the breast is 165°F, or the meat at that point is no longer pink. Chances are good this will take less than 30 minutes.
If your frying pan won’t hold all the chicken you want to cook, work in batches, removing the browned pieces to a suitably-sized baking dish. Put it in the oven when all the chicken pieces are browned, and cook until they are done, as per the instructions above.


If, for some reason, you don’t have the use of an oven, you can continue cooking the chicken on the stove top on medium-low to low heat, turning every 5 minutes or so, until it reaches the desired internal temperature. If you cover it with a lid, it will steam rather than pan-roasting; lots of juice will collect in the covered pan, and often the chicken becomes tough because it cooks quite quickly. Leave the lid off, and keep right on top of the done-ness situation with a thermometer so you don’t overcook. Remember, you’re investing time in cooking delicious chicken now, so you don’t have to do it over and over again later.
Let the chicken rest for 15 minutes before choosing some for your dinner. You can let the chicken cool uncovered for half an hour at room temperature, and then pop it into the fridge, loosely covered with plastic, to cool completely. I like to take the chicken out of the roasting pan and cool it on a plate, so I can wash up the frying pan and wipe down the stove while I’m waiting for it to become cool enough to wrap.


Wrap up each chicken breast individually in plastic, and put all the parcels in a freezer bag for extra protection from dehydration (also called “freezer burn”). While you may be tempted to reproduce the commercial product by slicing the cooked chicken into tasty, bite-sized pieces, resist the temptation: it will stay much juicier if you leave the pieces whole, and slice them as needed later on.
Canada Food Guide standards define a single serving of meat as 2 ½ ounces. Half a chicken breast of the size pictured is a generous serving. I don’t know what your appetite is like, but it helps to be aware of the quantity of nourishment you’re ingesting.

8 ounces when raw…

6 ounces when cooked.
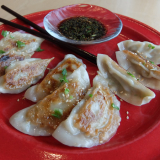
My four chicken breasts and the tenders from them yielded at least 9 meals that I didn’t have to carry out or “cook” from scratch. The cost of the meat alone for each meal was about $2.50. Over two weeks, I made crispy chicken strips from the tenders, a chicken club sandwich, a couple of salads just like the ones you buy at Wendy’s, enhanced a bowl of ramen, made a fried rice that was heavy on the chicken and veggies and light on the rice, a stir-fry with fresh veg and noodles, and a whole lot of lettuce wraps — even a chicken pizza! Now THAT’S fast food, right from my kitchen! With the money I saved by NOT using the drive-through, I think I’ll go buy myself a lobster!


Leave A Comment