


My sister Gina, she of the bird-like bones and appetite to match, is a very healthy eater. Quietly, she makes sure she balances her intake with all the appropriate nutrients, and her portion control is beyond reproach. No matter what, she always leaves an allowance for some representative of “The Brown Food Group”, which contains all things good, most importantly, CHOCOLATE. Long ago we used to enjoy Baskin Robbins’ Mandarin Chocolate Sherbet — a portent of things to come. Now, it can be straight-up high percentage dark chocolate, or our brother-in-law David’s excellent brownies.
It must be a family trait. If it’s not chocolate, it’s not dessert as far as I’m concerned. This Fallen Chocolate Cake is the perfect special occasion dessert. The last time I bothered to celebrate my birthday, this was not the first choice — it was the only choice. Any recipe that starts with “10 ounces of bittersweet chocolate” is going to be good by default. Technically more of a soufflé than a cake, it puffs up while baking, and then falls upon cooling, leaving a cratered top that can be filled with whipped cream, or ice cream, or fruit, I suppose, if you have to. The cake itself is pretty much a truffle. Did I mention it’s flourless?
From a “single serving” standpoint, it had been my intention to whittle this recipe down to a one-egg batch. That proved to be something beyond difficult. Making a half-recipe, however, is quite achievable. Depending on your appetite, you will have about 6 servings from a half-batch, so plan to share, or make it last the whole week, which it will certainly do if refrigerated. (Ha! I can eat a mouthful every time I open the refrigerator door, so you can be sure it won’t last the whole week for me!) You can freeze it, but it’s never the same after that.
This cake is a little bit fussy, but well worth the effort. Summer (with a pile of fresh berries) or winter (with boozy orange segments), it’s a showstopper.
Fallen Chocolate Cake
Ingredients: I made a full recipe on picture-taking day, so that’s what I’m showing. For the Half Recipe, check out the recipe posting (click here).
- 1/2 cup Butter
- 1/4 cup Sugar for the custard base
- 1/2 cup sugar for the meringue
- 2 Tbsp sugar for dusting the pan
- 10 ounces Bittersweet Chocolate*
- 2 Tbsp Vegetable oil
- 6 Large Eggs, separated
- 2 Tbsp Unsweetened cocoa powder
- 2 tsp really good vanilla
*Don’t mess with this. Semi-sweet chocolate is too sweet, and milk chocolate is out of the question. Although this is an INTENSELY chocolate cake. unsweetened chocolate would be TOO intense.


If you’re seeking perfection, this cake needs a spring-form pan, because you serve it right-side-up. If you try to turn it out of a regular cake pan, you will be serving it with a spoon – it just doesn’t have enough structure to be turned out of a regular pan and put on a serving plate for presentation, even if you use parchment paper. That being said, it would still taste great, so don’t run out and buy a piece of equipment you may never use again. I use my spring-form pan pretty often, about as often as I use my angelfood pan. You can get spring-form pans in all sizes fairly readily. A full recipe needs a 9 or 10 inch diameter pan; a half-recipe needs about a 6 inch diameter pan (or you could bake it in casserole, if you’re not planning to turn the cake out). The pan needs to be deep enough to accommodate the rise and fall of the baking process, or you will have intensely chocolate burned batter on the bottom of your oven.
Method:
Preheat the oven to 350°F. Grease your baking pan, and dust it with sugar. I don’t know why. The recipe said to do it, so I did. It probably has something to do with keeping moisture in the cake.
In a smallish bowl, melt the butter and chocolate with the oil. You can do this over simmering water if you want to, but the easiest way to do it is in the microwave. Use medium-low power, and check it every 2 minutes. If you use full or high power, you run the risk of burning the chocolate, which is an expensive error from which you can’t recover. Be patient, grasshopper: you don’t make this cake every day. Stir everything together until pretty well combined, and let the mixture cool until it’s just warm.


To make the batter base, separate 4 (or 2) eggs , putting the yolks in a pretty large bowl, and the whites elsewhere for the moment. To the yolks, add the remaining two (or one) whole eggs, ¼ cup (2 Tbsp) of sugar, the cocoa, vanilla and salt. Whisk until everything is smooth.

Whisk in the warm melted chocolate mixture. Magic happens. The mixture becomes quite thick, like custard or finished cake batter. Don’t be scared.


Now you need to make meringue. In a clean, dry bowl, using a clean, dry whisk or an electric mixer, beat the egg whites until nice and foamy. Add the sugar a little at a time, continuing to beat until the mixture holds a firm peak.


Add about a third of the meringue to the batter base. Gently stir it in with the whisk: this is called “lightening the batter” and prevents all the air bubbles in the meringue from bursting when you add the rest to the batter.


Add the remaining meringue, and gently fold it into the batter until no streaks of meringue remain. Be attentive to the bottom of the bowl – unincorporated batter can remain there, which will sink like lead in the cake as it bakes.

Turn the batter into your prepared baking pan, smoothing the top. Several source recipes called for a sprinkling of sugar over the surface of the batter, so I did that, even though I don’t know why. As my cake baked, the top crackled like a good chocolate cookie, so maybe that was the reason. I only had one birthday when I made this cake, so I didn’t make another cake without the sugar sprinkle just to see what would happen. Sorry.

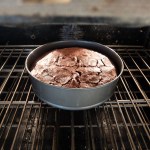
Bake in the preheated oven for 35 to 45 minutes, until puffed and set (gently shake the pan – it shouldn’t jiggle a lot in the middle). Cool to room temperature in the pan on a rack. The centre of the cake will fall, leaving a nice ridge around the edge to confine whatever goodness you plan to fill it with.
Remove the rim for serving, but don’t attempt to slide the cake off the base – it’s pretty much glued in place. I had forgotten a tip my friend and mentor Sabrina had given me – if you install the base of your springform pan upside down, you have a nice smooth surface to serve from, rather than dealing with the raised lip of the base. I’m kind of wishing I had remembered that…


I filled my cake with my favorite whipped topping: 8 oz. cream cheese, beaten with 1 cup of sugar and 2 tsp vanilla, and then whipped at high speed with 2 cups of very cold whipping cream until it holds its shape. Debbie introduced me to this – it’s like the best of whipped cream and cream cheese frosting all in one, and it doesn’t melt or deflate at room temperature. Leftovers keep in the fridge for a week in a covered container. It’s a great dip for strawberries.
To make this cake your own, you could flavor the batter with citrus zest, or espresso powder, or liqueur. You could probably incorporate some finely-chopped toasted nuts. My friend Vicki would likely add a little chili powder for that “Diablo” effect. You could fill it with a layer of jam under whipped cream, or chocolate mousse, or vanilla pudding and a bounty of fresh berries. You could make individual servings in little ramekins to eat while still warm, with a spoon (don’t fill more than half-way — the dish or your mouth).


Leave A Comment