


While this cheese is very much like ricotta, purists will tell you it certainly isn’t (true ricotta being a byproduct of mozzarella making, derived from the whey). However, it quacks very much like a duck. Technically, this is the process for making paneer, a pressed fresh cheese used in Indian recipes. Before you press the curds into paneer, it’s as close to ricotta as you need to get.
You may wonder why I take certain projects on – I know my friend Vicki does. “Why on earth would you make your own fresh cheese when there’s plenty of cheese in the store?”
Well, this one’s for Ethan in Japan, whose access to cheese is limited, and for Carter, who misses cheese terribly in his lactose-intolerant state.
Long ago, when my Mom came home from work, one of her favorite things to eat was a bowl of cottage cheese with diced fresh tomatoes, and probably a little salt and pepper. I think it’s one of Robin’s favorites too. As a child, I thought this was absolutely yucky. Now that I am older, one of my favorite dishes is hot pasta tossed with herbs, fresh cheese (cottage cheese’s cousin), and hot grape tomatoes, with garlic and olive oil. Mom would have loved it.
On the other side of the world, my son Ethan has been making “Jar Salads”, a very beautiful approach to lunch that involves layering delicious salad ingredients in a glass jar. I’m not sure if you “shake and eat”, or tip the works into a bowl, toss and eat, but his salads look beautiful in their jars. I couldn’t help but think that a layer of crumbled goat cheese would be a lovely addition, but it’s either difficult to find in Japan, or pricey, or maybe both. At any rate, home-made ricotta presses down into a cheese very much like paneer (from Indian cuisine), which could be flavored and then cubed or crumbled to add to Ethan’s salads. It’s a fun project.
As for me, I make fresh cheese because I can. When I have visitors, or when I’m making a fancy dinner, I tend to buy more milk and cream than I can reasonably use. Making it into cheese is a great way to extend its useful life. I make big batches of ricotta gnocchi from it, which I freeze and dole out over time. It’s also great for stuffing pasta shells or cannelloni. DIY fresh cheese is lower in sodium than store-bought, I’ll wager, and contains no stabilizers or preservatives, if that’s a concern for you. Its shelf life is short, though, so it’s best to make it into something (like cheesecake) and freeze that.
Here are the basics, with a couple of ideas that cropped up along the way. It’s fun kitchen science to do with kids, if they’re interested. They’ll often try a new food if they make it themselves.
Fresh Cheese
Ingredients:
Many on-line source recipes start with a gallon of milk. That’s 4 litres. You don’t need that much cheese, my single-servers.
- 1 litre (or 4 cups) milk (anything from skim to whole – it all works)
- 250ml (or 1 cup) cream (anything from half and half to whipping)
- ½ tsp salt
- ¼ cup lemon juice (fresh or bottled) or white wine vinegar

In spite of much internet advice to the contrary, I made a perfectly nice little batch of cheese from lactose-free milk and cream. Sources stated that UHT treated milk (Ultra High Temperature pasteurized), which most lactose-free milk is, would not form curds. That has not been my experience.
Method: Heat your milk, cream and salt just to the boiling point. Many recipes advise using a non-reactive saucepan (because of the later addition of lemon juice), and frequent stirring to prevent scorching, over medium heat on the stovetop. If you don’t have a microwave, do it that way. Using the microwave eliminates all possibility of scorching and the need for stirring (although you can boil the milk to the overflowing point if you aren’t careful). In the microwave, heat the milk, cream and salt in a large glass bowl or measuring cup on full power until it registers at least 180°F. My microwave took about 11 minutes to get the job done – yours may take longer or shorter, depending on its power.

Add the lemon juice and stir gently to distribute. The milk will start to curdle pretty quickly.


If you want very finely textured cheese, something like cream cheese, let your mixture sit at room temperature for 10 to 15 minutes before straining.
If you want slightly larger curds (perhaps heading toward a nice pat of paneer) you can keep cooking the mixture (not stirring) at very low temperature for a further 10 to 15 minutes. I put mine back into the microwave at 20% power (or power setting 2) for 10 minutes, and then let it sit for 20 minutes at room temperature before straining, because I wanted to get as much curd out of the milk as I could.

When making cottage cheese (which I have never accomplished), you continue to cook for as long as 30 minutes before straining and washing the curds. I never achieved curds big or firm enough to wash. I haven’t given up – I just haven’t got there yet. Did you know that “creamed cottage cheese” simply has heavy cream added back to the curds after they have been washed? Who knew?

Little Miss Muffet, Sat on her Tuffet, Eating her Curds and Whey…
Now comes the straining part. You can line a sieve with cheesecloth, paper towels, coffee filters, or a very clean cotton or linen kitchen towel. One source suggested using an old bandanna, which has a certain folksy charm.
Cheesecloth, not surprisingly, works best. Use 4 layers – if you only use 2 and squeeze the cheese at all while it’s draining, the solids will squirt right through. Cheesecloth is porous enough to drain efficiently, quick to release the curds when required, cheap and disposable (biodegradable too). I don’t think the name is a coincidence.
Paper towels work well, but draining takes a very long time; ditto coffee filters. If your kitchen cloth has color, you run the risk of seeing that same color in your cheese – just sayin’. Lucky me — the cheese wasn’t pink.


Some recipe sources suggest spooning the curds (which float to the top) into your lined sieve. I just gently tipped the whole works in, taking care to control the edges when I used paper towels, as they tend to fold into the middle in a most infuriating fashion, which is probably why dampening your liner is often recommended.

All my sieves are conical. If I was going to do this more than once or twice a year, I would probably go out and buy a round-bottomed sieve or colander for this purpose, as it’s much easier to keep the bottom elevated out of the draining whey. Go with what you have. Let the cheese continue to drain until it has the consistency of softened butter, and is no longer dripping.
You can leave it in the sieve to reach this stage, or wrap up the loose edges of the cheesecloth, tie them with a string, and hang the bundle from a cupboard handle – especially if that’s the way your mother used to do it.
I don’t recommend any kind of pressing if soft, ricotta-like cheese is your aim – just be patient, and move the process into the fridge if it seems to be taking a very long time (like more than 30 minutes), as it well may if you are using paper towels or coffee filters.


Now you get to play with your food. Not surprisingly, this fresh cheese tastes a lot like the milk it was made from, so you can go sweet or savory.
Fresh fruit and a drizzle of honey are classic with ricotta. If you don’t keep honey on hand (or yours has crystalized, as mine has), try adding a little brown sugar and cinnamon, and dipping fresh apple slices. Sprinkle on some granola. Spread it on a graham wafer. I’m sure you’ll think of plenty of things to enjoy.
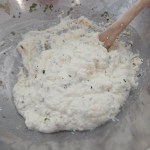
My palate prefers savory applications, so I added dried basil, chives, a bit of seasoning salt, some black pepper, and a healthy dose of my favorite no-salt onion and garlic herb blend. At the school, we use fresh herbs and garlic, making a spread for crostini, topped with bruschetta – always a winner.

I went to tremendous lengths to make a contraption to further press and drain my flavored ricotta, hoping to make a cube-able cheese for Ethan.
Final analysis? Don’t bother. Wrap it in cheesecloth, sandwich it between a couple of plates, top it with something heavy, and wait.


When I was checking it at the 18 hour mark, I found it was the consistency of spreadable cream cheese, only much less salty and much more flavorful, so I ate it. Repeatedly. It was beautifully melty on a hot toasted bagel.


I managed to press a second batch into something much more paneer-like. This batch started with skim milk, and was cooked for a longer time, which seems to be the correct formula for this application. You can count on 24 hours of pressing time in the fridge. While I wish I had flavored this batch before pressing, I found that if I sprinkled the cubes with a little smoked paprika and salt, they were pretty tasty.


What to do with all that whey? The internet abounds with suggestions. I tasted the whey from my cheese, and it was something like buttermilk, although a little salty. Because I choose lemon juice as my acid, I think the flavor is about as good as can be expected – I don’t think residual white vinegar would be as acceptable. The best suggestion seems to be to add your whey to a fruit smoothie, where it would add protein and otherwise be unnoticed. I used some to make pancakes with good success. There are some folks who suggest you feed it to your pets, and some who said it make their pets sick, so go easy with that. If I was on the farm, I would add it to the pigs’ slop, and they would likely enjoy it very much – more streaky bacon in the long run.


Leave A Comment