


Sometimes the only way to really learn how to make something “just like Grandma does” is to stand at Grandma’s elbow and watch her do it. When she adds ‘a handful’, how big are her hands? Is her pinch a two-finger pinch or a three-finger pinch? Does her arthritis make her handle the dough more delicately than your strong hands would? All these things are important to the outcome. Many a cooking skill has been lost because the beloved heritage recipe box has not been backed up with a few hours of hands-on experience. If you have a Gramma, Auntie, Uncle, Mom or Dad who hold the secrets, make sure you get in the kitchen with them, even if they don’t want you there, and watch them work their magic.
Everybody has their favorite brownie recipe, and I’m going to share mine with you. I promise not to leave out any secret ingredients or tricks, and I hope you reap the same compliments that have been so graciously bestowed on me over the years. At the risk of boring you silly, I’m going to give you all the information that you would get if you were standing beside me while I make these – after all, I’m a Gramma too!
I have written up my original recipe, which yields an 8-inch square pan, in case you need to make a full batch to share, or to compensate for a hard week at work, or to heal a breaking heart. You can make a half-batch in mini-muffin liners for Two-Bite Brownies, decorate them creatively, and package them up like chocolates for holiday gift giving. These two-bite brownies are twice as good and much less expensive than the pre-fab brownies in the bakery section at the grocery store.
One bowl, one spatula, toaster-oven friendly – what are you waiting for?
My Favorite Fudgy Brownies
Ingredients
4 or 5 squares (4 or 5 ounces) of baking chocolate. Four ounces is the minimum. I have seen recipes with as many as 6 ounces of chocolate and additional cocoa and chocolate chips, but I think they go too far. I used to use two squares of Baker’s unsweetened chocolate and two of bittersweet, but all bittersweet works better, in my opinion. Now I’m using 2 ounces of Bittersweet, and 3 ounces of Baker’s Special Dark. The use of some unsweetened chocolate would make these brownies very deeply flavored, but if you use all unsweetened chocolate, the texture suffers. Semi-sweet is ok if you have to. I never use chocolate chips. Occasionally I use very, very good dark eating chocolate if I have been given a whole bunch for Christmas or my birthday, and it works well. Milk chocolate will be too sweet for me, but if you really love milk chocolate, give it a try.
½ cup butter. I use salted butter. I know, I know – REAL bakers use unsalted butter so they can control the flavor of their finished product. I have used the same brand of butter for years, and its saltiness has never been an issue. Salted butter has a longer shelf-life on the counter, in the fridge, and in the freezer. As a solo diner, I don’t go through a whole lot of butter, so the longer shelf-life of salted makes it a better choice for me. If different butters have different saltiness where you live, then use unsalted butter. Please don’t make these with margarine unless you are vegan.
1 cup granulated sugar. There is so much technical information on the different kinds of sugar that I dare not start explaining this choice. You’re just going to have to trust me. I have never tried a sugar substitute, and I sincerely doubt that it would produce identical results.
1 Tablespoon vanilla extract. This is not a typo – I really mean 1 Tablespoon. If your budget allows you to use real (as opposed to artificial) vanilla extract, please do so. Every time a friend of mine goes to Mexico, I ask them to bring me back vanilla, and I have noticed that there is quite a variation in flavor from brand to brand. I use a tablespoon of my favorite: you can make your own choice.
2 large eggs. Not extra-large, not medium. I don’t care what color they are, or if they are free-range or Omega-3 fortified. Size matters. Use large.
Pinch of salt. I use a three-finger pinch. You could use ¼ teaspoon if measuring is your thing. If you use unsalted butter, you don’t need a whole lot more. Don’t leave it out though – it’s a flavor enhancer.
¾ cup all-purpose flour. Measure carefully. I have made a batch with the Red Mills gluten-free flour, and it turned out just fine. Gluten development isn’t a big factor in this recipe, so xanthan gum is not strictly required, although adding 1/2 tsp will help with the usual crumbling associated with gluten-free baked goods.
Don’t even ask me about whole wheat flour. Brownies are not health food.


That’s right – there’s no leavener at all. No baking soda, no baking powder, no yeast, no beaten egg whites. If these didn’t have flour in them, they would be pudding.
Some folks like nuts in their brownies, and you could add half a cup of chopped nuts to this recipe without causing any problems. Some folks swear by the addition of espresso powder, and they might be right. I don’t add either of these things.
Method:
Pre-heat your oven. Preheating is important – it takes most ovens at least 15 minutes to fully preheat, and 30 minutes is better. A toaster oven takes less time. If your toaster oven is a convection oven (that’s moving air, by the way) with no option for non-convection, reduce the temperature to 325°F.
Melt the butter and chocolate together. I make my brownie batter all in one bowl, so I melt the chocolate and butter in it first. I use the microwave on power setting ‘2’, which means 20% of maximum power (I have a honking big microwave with LOTS of power). The point of melting in the microwave using a low power setting is that there is much less possibility of burning. If you use full power, you have to stop and stir every 15 to 30 seconds, which is a nuisance. Use low power, and do something else while the chocolate melts. It will take about 8 minutes, and then it can sit for another 4 minutes to completely melt. You can melt your butter and chopped chocolate over very low heat in a small saucepan, or in a bowl over simmering water if you don’t have a microwave.


Stir in the sugar. I use a silicon spatula; there is absolutely no need to use any kind of electric mixer. This is a fudge brownie, so you don’t want to incorporate very much air while mixing. At this step you are lowering the temperature of the melted butter and chocolate to the point where there is no danger of cooking the eggs when you add them.


Add the eggs. You could beat them up with a fork first, but you don’t have to. Stir for about 15 to 30 seconds so that everything is well combined.


Add the salt and vanilla. Stir for another 10 seconds so that the ingredients are evenly distributed.


Add the flour. Stir gently, but make sure that everything is evenly combined. Be watchful for little pockets of flour that hide in the bottom of the bowl. You should be done within a minute.


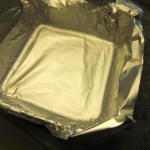
Turn the batter into an un-greased 8-inch square baking pan and spread it evenly. The original recipe calls for an ungreased pan, because greasing is a waste of time — these brownies will stick to the pan no matter what. I use a Pyrex 8-inch square baking dish lined with non-stick foil. I like to be able to lift my brownies out of the baking pan to cut them, and the foil facilitates this. It’s not a requirement – it’s just what I do. You could use 2 strips of baking parchment cut to the exact width of the pan, crossed to leave overhang on all sides, but I’m pretty sure the batter will creep under the parchment as it bakes — better than no lining though.
If you use a disposable foil pan, be sure put it on a baking sheet to insulate the bottom and prevent scorching.


If you mold your foil over the bottom of the pan first, you can just slip it into the pan and crimp the edges. This allows you to avoid pushing your finger through the foil while trying to tamp it into the corners.


Bake in the centre of a pre-heated 350°F oven for exactly 30 minutes. The centre of the oven is important. Most ovens have warmer zones and cooler zones. The centre of the oven is pretty reliable for even, consistent heat. If you were making four pans of brownies at one time, for example, you would need to rotate their positions at the 15 minute mark to ensure even baking. (Why are you making four pans of brownies at one time?) I made all my batches in my toaster oven, because I had a batch of tomato raisins going in my regular oven – they all turned out just fine.
Remove the brownies from the oven, and place the baking pan on a rack. Now comes the hard part. Wait for the brownies to cool completely to room temperature before you cut them. There are two reasons. The first is that you’ll burn your mouth if you don’t wait. The second is that these brownies are barely cooked through, so you need to wait for them to set up. Sorry. It takes about an hour.

These brownies are absolutely delicious just the way they are, but if you want to make them even more perfect, float a layer of ganache on top. Melt 1 cup of chocolate chips with ¼ cup heavy (whipping) cream on half-power just until the cream starts to boil. Let sit for a minute or two, then stir vigorously until smooth and shiny. Pour the ganache onto the still-cooling brownies so that it bonds to the surface. Tilt to spread.
If you know how to make a very good fudge frosting, that would do. It’s too sugary for me.


If you want your brownies to stay absolutely perfect right to the last piece, don’t ever cut more than you plan to eat, and don’t ever put them in the fridge. Store them in their baking pan, wrapped airtight, at room temperature, if you plan to eat the whole pan over the course of a couple of days (you’ll be sharing, right?).
Otherwise, wrap and freeze the extra brownies. I like to cut the whole pan into four pieces, wrapping and freezing three of the quarters for future consumption. I borrowed this idea from my brother-in-law, David, who used to send me the most wonderful Christmas baking in the mail. It’s better to freeze squares uncut – they dry out less that way. Unwrap them to thaw – otherwise they sweat inside the wrapping and the ganache gets yucky.


Two-Bite Brownies
Follow all the advice above. I did the math to halve the ingredients.
Ingredients
- 2 squares chocolate, dark or bittersweet
- ¼ cup butter
- ½ cup sugar
- 1 egg
- 1 ½ tsp vanilla
- Tiny pinch salt (two fingers)
- ¼ cup plus 2 Tablespoons flour (measure
carefully)
Method:
Preheat the oven to 350°F, or 325°F for convection toaster ovens.
Melt the chocolate and butter together.
Stir in the sugar.
Stir in the egg.
Stir in the vanilla and salt.
Stir in the flour gently but thoroughly.
Line mini-muffin pans with paper liners. Greasing the muffin pan is not enough to prevent these brownies from sticking, and the liners make for pretty presentation. If you can get parchment liners, they’re the absolute best.
Use 2 Tablespoons of batter per mini-muffin, which pretty much fills the liner. I have a portion scoop, which makes this easy. Put it on your “Wish List”. My yield was 12 brownies, and the bowl was pretty clean. You could make these in regular muffin pans – they will be thinner if you still use 2 Tablespoons of batter, so they’ll cook faster.
Bake in the preheated oven for exactly 17 minutes.
Cool completely before eating. The paper won’t peel off nicely if you don’t wait. They fall slightly while cooling.


Feel free to decorate creatively! These were my Christmas editions.

Because I love the combination of peanut butter and chocolate so much, I often melt equal quantities on a low setting in the microwave, stir them together, and make a nice thick coating on top of each little bite. Nutella works well all by itself


Regarding the issue of cooking at high altitude, here’s the short lecture. I live in Calgary, which is roughly 3,500 feet above sea level. That’s just at the point where altitude might be an issue. Leaveners like baking powder work more enthusiastically because of our lower atmospheric pressure, and water boils at a lower temperature. The only leavener in this recipe is the bit of steam that forms in the baking batter from the water in the butter and the egg. It won’t make a huge difference to a full pan Depending where you live, the two-bite version may cook at a different rate than mine did. Check them at 15 minutes for firm but tender centres when touched (there is no spring-back, and the toothpick test is misleading) – if they’re still liquid, they need more time.


Leave A Comment