


All right, I admit it. Starch is my go-to comfort food. Mashed potatoes, popcorn, toast – any of these things will smooth out any rough edges in my day.
When I make risotto, I always make a little extra so I can have risotto cakes in my freezer for quick single servings. Whether you made it plain or fancy, left-over risotto, formed into smallish hockey-puck shaped cakes, lightly coated with crispy Panko crumbs and fried in a bit of oil, makes a tasty quick dinner. If you need to keep things gluten-free, make sure to use crumbs made from gluten-free bread, or buy commercial gluten-free packaged crumbs.
(Poor lactose-sensitive Carter – I guess it’s Ichiban noodles for you again. Sorry!)
I like to stuff my risotto cakes with extra cheese. Arancini, a classic recipe using left-over risotto, is formed into balls with cheezey centres, and deep fried. Although I own a deep fryer, I only fire it up on special occasions. For daily leftover fare, shallow frying works better for me.
Refer back to my risotto recipe, make some, eat some, and let the rest set up in the refrigerator overnight for this recipe. You won’t be sorry.
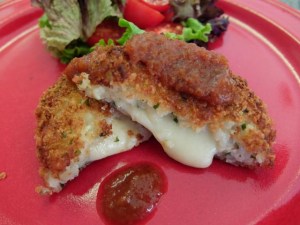
Risotto Cakes
Ingredients:
(Fun with leftovers)
- 1 ½ cups (or so) leftover risotto (from a 1-cup-uncooked-rice batch, which you ate a serving of last night)
- 1 egg, beaten
- Cheese (see the notes below)
- Panko or other dry breadcrumbs
- Oil for frying (canola, rice bran, peanut, sunflower, safflower….. anything that will take higher heat, and specifically NOT Extra Virgin Olive Oil)

Method:
Combine the leftover risotto with the egg. Yes, it will be sticky.
If you only have a single serving of leftover risotto to work with, add just an egg yolk instead of a whole egg. The egg is there to keep the cake together, so don’t leave it out. If your risotto was super-runny, add just enough breadcrumbs to the mixture to firm it up, and leave it alone for 10 minutes or so while the extra liquid is absorbed.


Cut cheese into ¼ inch-thick slices. Cut the slices into squares about an inch or so on a side. I chose Smoked Havarti. Classically, you would choose mozzarella for maximum oozy stretch – kids love this. There are no rules – try anything that melts. This is a good time to take those leftover ends and bits, grate them up, squeeze them into centers and form the risotto cakes around them. Soft cheeses like brie and some blues may melt into oblivion – just a word of warning.
If you started with risotto that already had bits of good things in it, like mushrooms or dice beets, you don’t need to make cheesy centers. You could, if you wanted, fortify your risotto cake mixture by mixing in an extra hit of grated cheese – some crumbled feta or goat cheese would be great with those beets.

Divide the risotto/egg mixture into portions that reflect your appetite – about ½ cup works for me.
Using wet hands, form a cake around a slice of cheese, enclosing it completely. As you form them, put them right onto crumbs in a shallow dish or plate. Wash and dry your hands before proceeding, or you will end up with more crumbs on your hands than on the food.


Coat the cakes with crumbs, pressingly lightly to make them adhere.

Heat ¼ inch of oil in a frying pan until shimmering hot. Shallow-fry the cakes until golden brown, turning once, about 2 minutes per side. Drain on paper towels.
I have included some extra notes about shallow frying below.


Serve as-is, or with a nice puddle of tomato sauce, salsa, bruschetta, or even a squirt of ketchup. Smile and make that “Mmmmmmm” sound.
You can freeze your risotto cakes either before or after cooking. I like to freeze mine after they are cooked to a lovely golden brown – then I can simply re-heat them until warmed through in my toaster oven. They won’t be as crispy-crunchy-golden-munchy as they are right out of the frying pan, but they’re still pretty good. Reheating in the microwave makes them a bit soggy, but it’s an acceptable option. Use half-power for even heating.
Just a few words about shallow frying in general…..
Shallow frying is a bit messy for sure, but the results are well worth the effort. Shallow frying uses less oil than deep frying, and it’s easier to clean the pan than the deep fryer. The oil doesn’t need to be as deep as the food you are cooking – something just under ½ inch (1 cm) is best. Turning the food is essential, and long-handled tongs are the best tool for the job, with a long-handled flipper taking second place (less control, more splashing).
Choose a frying pan with nice deep sides. Use medium-high heat at most, especially if you are using a non-stick coated pan. When you are frying anything, keep a lid nearby, big enough to completely cover your frying pan. It’s the best way to put out a frying pan fire – just put on the lid as you turn off the heat and move the pan off the burner. NEVER use water on an oil fire. A very generous sprinkling of baking soda will smother flames, but a lid works just as well, and is ultimately much less messy.
Choose an oil that is tolerant of high heat. That means it won’t catch fire at a relatively low temperature, and it won’t change flavor at high temperature either. That means NOT EXTRA VIRGIN OLIVE OIL — its lovely flavors are destroyed at high heat. Cost is a factor, as there is going to be plenty of oil destined for the garbage when the job is done. Neutral flavor may be preferrable – depends on what you like. Canola, grapeseed, sunflower, rice bran, peanut, even coconut oil all work just fine. I use sunflower oil, myself, and save my more expensive rice bran oil for searing meat.
You need to have patience to let that oil get good and hot – you want a nice sizzle when the food is put in the pan. Good quality oil, perfectly hot, is the secret to non-greasy results. You’ll know you’re approaching the right temperature when the oil starts to get more runny, the surface of the oil shimmers, and you might see little wisps of smoke. This may take as long as 5 minutes, but don’t leave the pan unattended! If you are unsure, drop a little bit of whatever you are frying into the pan – it should sizzle immediately, and start to brown in less than a minute. If you happen to own one of those fancy surface-temperature-reading thermometers, you’re looking for something between 350°F and 375°F. Adding food will drop the oil temperature for a short while, but keep an eye on it – you may need to turn the heat down to prevent burning, or to keep the oil from flaring as food browns. As with deep frying, the surface of whatever you are cooking needs to be as dry as possible to limit the spitting and bubbling that happens when water meets hot oil.
If your oil is good and hot, and your food is good and dry, less oil will be absorbed into your tasty treat. When you are feeding a crowd or having a big-batch cooking day, you may need to add more oil as you fry off those batches. Make sure it gets nice and hot before you add more pieces of food, or they will be oily and soggy and not very nice at all.
Safety first for tasty treats! Wear an apron, and keep the dog outside.


Leave A Comment