Pancakes were a family ritual almost every Sunday morning when my boys were growing up, and I know my oldest son continues this tradition with his family. Over the years I experimented with a variety of batter thicknesses, whole grains and seeds, extra eggs or beaten egg whites, cornmeal, maple syrup in the batter, etc., etc. I think I tried “Swedish Pancakes” once from an old “Better Homes and Gardens” recipe, but they weren’t anything special, possibly because I may have been somewhat … inventive … in my execution. I think I had some made-up memory of an auntie who made them silver-dollar sized — not the best approach.
When I was challenged to come up with a variety of breakfast recipes for the Foods 10 students, I decided to revisit the concept. To my great surprise, research revealed that Swedish Pancakes are tender and delicate, thin and eggy, with a flavor like custard, and a batter as runny as table cream. Although they don’t have the same pedigree as a French Crepe, they are almost as versatile.
I had quite a challenge paring this recipe down to a one-egg batch. A survey of six recipes revealed a wide variety of ingredient measurements (reflecting how each recipe-writer’s Grandma made them, I think). Simple math wasn’t going to do the trick. I went back to the basic ratio for crepe batter (by weight: two parts egg, two parts liquid, one part flour) and worked from there. French Crepes are leaner, and the batter is a little thicker, so I had to experiment to see how much milk, sugar and butter led to the best result. There were MANY trial pancakes in my garbage can, with one bite missing. Oh, the sacrifices I make for you, my readers!
I happen to own a 10-inch crepe pan, and I hope you do too. If you don’t, you can make these in a regular non-stick frying pan with an 10 to 12-inch diameter (measured from rim to rim) – just don’t roll the batter too far up the sides in your enthusiasm!
Swedish Pancakes
I’ll bet you already have everything you need in your fridge right now.
The amount of batter you create will depend on exactly how large your “large egg” is. In a small-yield recipe, even a half teaspoon of extra liquid can make a difference. Measure carefully for accurate results.
Concerning your hardware, if your crepe pan or frying pan’s non-stick surface is tired from age or abuse (not by you, I’m sure), you may have sticking problems with these pancakes. While I am the champion of multi-tasking equipment, I must admit I keep my own crepe pan segregated, and safeguard it’s maintenance.
Ingredients:
For two 10-inch pancakes:
- 1 Large Egg
- 1/2 cup Milk
- 2 tsp Sugar
- Pinch Salt
- 1/4 cup All-Purpose Flour
- 1 Tbsp Butter, melted and cooled

Method:
Whisk the egg to combine the yolk and the white.

Whisk in the sugar, salt, flour and HALF the milk. Whisk until very smooth.


Whisk in the melted butter. Be sure it has cooled enough not to sizzle as you add it.

Slowly whisk in the remaining milk. Bubbles are not your friends – try to keep them to a minimum.
This small batch makes about 1 cup of batter.


When I’m making a big batch for brunch, or to stock my freezer, I make the batter a day ahead. That way there are absolutely no bubbles, and the gluten has developed to the point where the pancakes are just a little easier to handle. I don’t make this batter in the blender because my trial batch came out with quite a thick layer of fairly dense foam on the top, resulting in unacceptably lacy pancakes.
Heat the crepe pan (or frying pan) over medium heat. Spray it with a little oil, then wipe the surface with a paper towel so that only a trace of oil is left.

You may want to cook a “trial pancake” to check the pan temperature. My setting, on a gas range, almost always ends up just a bit cooler than “medium”. If you have an electric range, start at medium, and modify as you go. Let your pan heat for at least 5 minutes on the electric element. At cooking school the first crepe was the trial balloon, almost always thrown away. If was the guide to make sure the lubrication of the pan and its temperature would be properly modified for the rest of the 50 or so that followed. With a small batch of batter, do your trial with just one generous teaspoon of batter — you don’t have much to spare. It is better to err on the cool side than it is to burn your first of only two Swedish Pancakes.
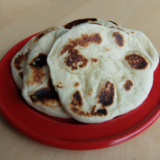
The batter is so thin, it’s hard to make small round pancakes. Mine all looked like some variation of a map of Australia.


For a full 10-inch pancake, use a scant ½ cup of batter. Pour the batter into the centre of the pan, immediately swirling the batter to the edges by tipping in a circular motion. You are aiming for even coverage. I only get really good at this by about the 10th pancake – perhaps you have more talent. With this small recipe, your practice time is somewhat limited.


Allow the pancake to cook until the edges show browning. We made quite a lot of these with the students, and found that it was better to let the pancake get a little browner and more set before attempting to turn it. Otherwise, the pancake is so tender, it tends to rip.
The surface of the upper side will go from wet and shiny to cooked and dull, and steam pockets will form from underneath.


Loosen the edges with a flipper, slide the flipper under a third of the pancake, and gently turn it over. The second side will finish in less than 30 seconds, and the pancake can be slipped off the pan onto a waiting warm plate.


Pancakes can be stacked (they won’t stick to each other) and held warm between two plates if you want to serve a lot of people all at once.

For storage, they can be folded in quarters, allowed to cool completely, and sealed in zip-lock bags for the freezer, separated by parchment paper or plastic wrap if you made oodles, and want to retrieve them one at a time. They re-heat really well in the microwave.
If you’re planning ahead for a party, just stack them flat and wrap them well with plastic when they’re completely cool. When they thaw, they will peel off the stack easily. At least, mine did.

Traditionally, Swedish Pancakes are folded in quarters and served with a sprinkling of granulated sugar, and a squeeze of lemon juice. That’s the way we served them in the Foods 10 class, and I don’t recall any leftovers.
The most popular breakfast in the student cafeteria when I was on the line 10 years ago was two pancakes, two eggs and bacon. If you wrap scrambled eggs and crisp bacon in a Swedish pancake, you can have that wonderful flavor experience in every single bite. Syrup optional, of course.

Swedish Pancakes are more rich and tender than French Crepes, which makes them a tastier “eat alone” option. Certainly Carter and I had no trouble at all eating the leftovers right out of the fridge. Of course, you can add whipped cream and sliced or pureed fruit for a real Sunday Brunch treat. Reheat one on Tuesday and garnish with a spoonful of fruit-flavored yogurt, or spread it with jam — lingonberry, if you’re going for authenticity. I like mine with cheese, preferably a little melting Camembert. Fold or roll, as suits your fancy. If you reduce the amount of sugar in the recipe (but don’t leave it out entirely — they’ll be awfully pale) you can fill your pancake with any savory mixture, from tuna salad to ricotta with chives and parmesan cheese. Heat your filled pancake through in your toaster oven, perhaps with a little cheese melting on top. Add a sauce for an elegant dinner.
Planning to feed a crowd, or perhaps stock your freezer? Here’s the ingredient list for a yield of 9 to 12 pancakes, depending on how skillful you are at rolling the batter, and how big your eggs are.
Big Batch Swedish Pancakes
- 3 Large Eggs
- 2 1/2 cups Milk
- 2 Tbsp Sugar
- 1/2 tsp Salt
- 1 1/4 cups All-Purpose Flour
- 3 Tbsp Butter, melted and cooled
The method is exactly the same. Make the batter a day ahead, and stash it in the fridge (in a covered container), if time allows. It will keep for a couple of days, if you don’t have time to cook them all at once.
Gluten-Free Option
I have used my “light” gluten-free flour blend in this recipe with great success (Kylie-approved). Don’t forget to add Xanthan gum – just 1/8 of a teaspoon for the small batch, and a bit more than 1/2 a teaspoon for the large batch! If you make your batter in advance, give it a good stir before beginning to cook, as the rice flour tends to settle out.
What is that “light” flour blend, you ask? I use the following ratio:
- 1 ½ cups brown rice flour
- 1 ½ cups white rice flour
- 3 cups tapioca starch
- 3 cups cornstarch
- 1 Tbsp potato starch (NOT potato flour)
I can no longer remember which website I poached this blend from, but I am grateful to whatever source that was. I made a bag-full and have been using it with great success for cake, Yorkshire pudding, pancakes and biscuits. America’s Test Kitchen has a similar blend (no cornstarch, but added skim milk powder), and we know they do their homework.
You need to add ½ teaspoon of Xanthan gum per cup of flour blend when you use it for quick-bread batters (like pancakes) or cookie dough.


Leave A Comment