


… or “What To Do When Someone Gives You The Bird”
This is the story of a “found” turkey. My friend, Vicki, was bringing order to her freezer. Ever the bargain-finder, she had a nice small turkey, unused in the holiday season, taking up an awkward amount of space – turkeys are a funny shape, after all. Now, Vicki is a wonderful cook, but that turkey was simply not speaking to her, so I volunteered to take it over and turn it into food, before it could become garbage.
Working with this lovely bird marks the beginning of a “Turkey” series. The Turkey Farmers of Canada would be more than delighted to have us consume turkey more often. They have done a great job of marketing turkey parts and ground turkey for those of us who have little need for whole birds. But sometimes, just sometimes, a turkey shows up in the supermarket that is such a wonderful price, it cannot be resisted. Whether it’s Thanksgiving, Christmas, or simply Thursday (or is that supposed to be “Turkey Tuesday”…), it’s good to have a plan.
Here, then, is what I choose to do with a turkey.
I haven’t roasted a presentation turkey in years. I like to break the bird down into its component parts, so I can brine and roast the breast, braise the dark meat, and make lots of delicious turkey stock, which becomes either soup or gravy (mostly gravy).
As regards “which came first…”, the cooked turkey or the stock, I’m choosing to start off with the stock. When I used to have lots of mouths to feed, the stock from the last turkey was the foundation of the gravy for the next turkey, carefully preserved in the freezer. Now that I am a solo diner, the call for a turkey dinner from my kitchen is rare. When the need arises, I break down my bird, and make stock first.
Breaking Down The Bird
Breaking down birds was part of my training at cooking school, so I have no trouble turning a small turkey into its component parts – it’s just a big chicken for the most part. Click here (https://www.youtube.com/watch?v=5–amriFgsQ) for a good guide to the process. (The guy makes it look so easy – he must do this all the time. When you only do it once a year, it takes a bit longer.)
The biggest challenge is that it is unwieldy — it tends to roll and flop and make your language colorful. Just do your best.
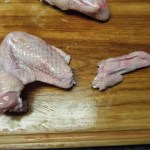
At the end of the process, you hope to have two “hind quarters”, leg and thigh attached (the dark meat), two “front quarters”, skin-on breasts (the white meat), and the wings, either whole or separated into drumette and wingette (real terms — I don’t make this stuff up).
The wing tip has no meat, so add it to the stock for the value of the flavor in the skin. You can decide about the wings — either braise them with the dark meat, make “Pterodactyl Wings” for your kids (which they will love), or toss them into the stock for extra flavor.


Turkey Stock
I was taught stock-making at my grandmother’s knee, and then learned how to do it properly under the guidance of my friend and mentor, Chef Simon Dunn, at cooking school. It’s a good skill to have, although hardly essential when pre-fab stock is readily available. In my “use the whole bird” scheme of things, turkey stock is central to the braised dark turkey recipe, so here’s the skinny.
“Stock” and “Broth” are largely interchangeable terms. Chef Dunn’s contention was that if you wanted your stock to taste like bones, use only bones. If you wanted it to taste like meat, use meat scraps. Bones from the raw carcass have meat attached, so in my opinion, you get the best of both worlds. Stock-making can be a pre- or post-turkey roasting process. If you use the clean (not licked) roasted turkey bones, carving scraps, and nicely browned skin for your stock, it will have lovely color and flavor.

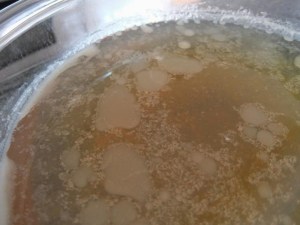
See how clear it is? Chef Dunn would be so PROUD!
Ingredients:
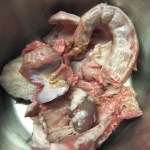
Innards – that package from inside the turkey with the gizzard and heart (let the liver go – not a good flavor enhancer)
Turkey neck (also from inside the bird)
Turkey bones (raw or cooked) with some meat still attached (I don’t need to tell you not to use the bones off the dinner plates, do I? Just the carcass from the carving board, please, including any scraps)
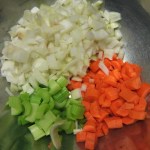
1 cup diced onion
½ cup diced celery
½ cup diced carrot
2 cloves garlic, smashed (optional)
Herbs: Fresh thyme, rosemary and sage, or dried whole versions of same (not quite as tasty)
1 tsp whole Peppercorns
NO SALT AT ALL
Cold Water


Method:
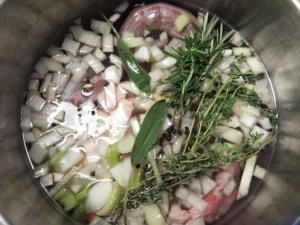
Put the meaty bones, neck, gizzard and heart into a large pot – whatever you have that holds everything with a few inches of head-room. I use the bottom of my spaghetti cooker. Choose something tall and deep so that the surface area is minimal, to reduce evaporation and the need to continually top up the stock with water while it cooks.
Add the chopped vegetables, herbs, and peppercorns.
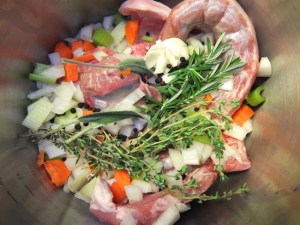
Fill the pot with COLD water, just enough to cover everything. When I say “cover everything”, onions and herbs float, so be aware of that. Don’t float too much.
Start on high heat JUST UNTIL BOILING IS ABOUT TO BEGIN. Try not to allow rapid boiling at any point in the process – it makes for cloudy stock. Cloudy stock is perfectly edible – just not very pretty. Turn the heat as low as you have to in order keep the liquid “just ticking over”, or the lowest possible simmer you can achieve. You can half-cover the pot, but don’t cover it fully or it will boil, no matter how low the heat is. And yes, the whole house is going to smell like turkey until the soup is done.
Imagine you can see tiny bubbles in the photo. That’s what you want.
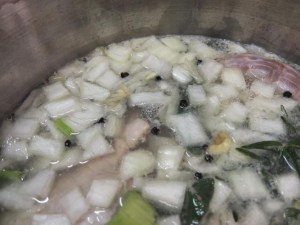
At cooking school we were taught to skim off the scum that forms on the top. I don’t do this at home, and it has never been an issue. For the clearest stock, it’s important not to stir, and not to boil, so I just leave it alone. I position the pot so that small bubbles are just forming and breaking with minimal agitation.
Leave it be for 4 hours. That’s enough. Any longer and the calcium starts to come out of the bones and you get really cloudy stock from that. Again, perfectly edible, just not lovely, and there’s no noticeable improvement in flavor.

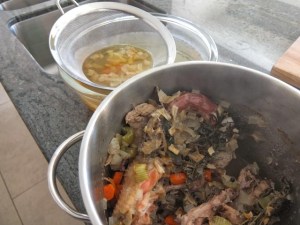
Slowly pour the liquid off the solids, through a nice fine sieve if you have one. If you’re careful, most of the cooked-out stuff will stay in the pot. Don’t even think about tring to harvest the meat from the bones, because it has no flavor left. Ditto the vegetables. Just let them go. Their job here is finished. You’re making stock, remember, not soup.
And take that smelly garbage out right now, please. You’ll be sorry if you wait. Bones are sharp, so you might want to consider reinforcing your bin liner with newspaper before you tip the leavings.
To avoid turning your fridge into a steam-bath, leave the strained stock, uncovered, in a wide bowl, at room temperature for about half an hour before moving it to the fridge. The best procedure, if you have room, is to put the stock container in your sink, then fill the sink with cold water (even adding ice) to hasten cooling. You may want to change the water a couple of times as the stock gives off its heat. When it reaches room temperature or thereabouts, put in in the fridge. Don’t cover it until it is completely cold.

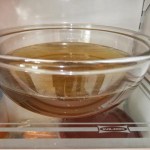
Cool the stock completely in the fridge so that the fat solidifies on top. Skim it off with a soup spoon. The stock will be jelly-like, which is a good thing — gelatin extracted from the carcass results in a nice, smooth, rich, texture.
De-fatting the stock makes it less greasy and more appealing when you later use it for soup or gravy. If you use fresh bones and no skin, there will be very little fat to remove. If you use the leftovers from a roasted turkey, including skin, there will be considerably more. If you’re a die-hard, you can harvest that fat to make the roux for “no bird” gravy — it freezes well.
If you’re planning to save your beautiful stock for some future occasion, and you don’t have a huge freezer, you can boil the stock in an open pot until its volume is reduced by half or two-thirds. Use a nice deep pan with a big, open surface for the quickest results (but it won’t be very quick, regardless). Don’t go off to the store or anything while you’re reducing your stock. It takes time, but not forever. Over-reduced stock will taste bitter, but can be rescued with water. Burned stock, however, ruins the pan.


Reduced stock makes delicious gravy. If you are wanting to make turkey noodle soup, dilute your concentrate until it tastes the way you want it to. Remember that you added NO SALT while you were making it, so you will need to salt your gravy or soup for maximum turkey flavor.
I usually store my frozen reduced stock in 2-cup containers or freezer bags. I save mine specifically for making stuffing and gravy the next time a turkey is required. You could freeze some up in an ice-cube tray if you know you will be using small quantities in stir fries, but use the kind with a lid, or bag the cubes, as they will evaporate to nothing if you leave them uncovered.
You can often find turkey stock in tetra-pack boxes in season, and “Better than Boullion” turkey base is available all year ’round, but there’s something very satisfying about producing your own turkey stock. You know your Gramma would be proud of you.


Leave A Comment