


If you ask my grandchildren what they would like for dinner, the answer is very often “Pizza!” It’s always on the menu when they come to visit me. When my own kids were little, “pizza” was marketed as a flavor, independent of the actual thing: pizza-flavored stuff was popping up everywhere. Pizza is just a fancy open-faced grilled cheese sandwich, with the flavors of tomato, oregano and basil in evidence, isn’t it? When those pocket-sandwich makers were re-introduced in the 90s, pizza flavors were implemented immediately at our house (along with Carter’s favorite ketchup, pickle and cheese pockets – all the flavors of a fast-food hamburger without the beef – but I digress).
Lots of families have their favorite pizza place on speed-dial – the perfect Friday-night dinner solution. I have a bit of a problem with delivery pizza as a single consumer – it’s pretty big, it’s pretty oily, it’s pretty salty, and it’s not exactly to my taste. Ditto the frozen product, whose sauce I find particularly, um, unsatisfactory. I also have the “no willpower” problem – if there’s a whole pizza in my kitchen, chances are more than good the whole thing will be consumed through the course of the evening – a piece here, a piece there, another one a little later on ….. oops – just one left at bedtime. Oh well…..
I have been making home-made pizza for more than 40 years now, first on bread-making day (ah, those really were the good old days), and then later when I acquired a food processor, because I could make pizza faster than delivery could arrive. It’s one of the first recipes I taught my boys. It’s the one I teach to two or three classes of high school students every year, and they make it by hand. It’s easy, even though it makes a bit of a mess and takes a little time. Most of all, it can be exactly the way you want it – thick or thin, dripping with olive oil or chastely low-fat, exotic or ordinary, or a final repose for leftovers. Also, cheap.
For company or family dinner, I make one huge pizza. For you, dear reader, I took the time to pare the dough recipe down for a single 10-inch fairly thin-crusted base. For me, this pizza is generous (‘cause I’m not a 16 year old boy). I have half for dinner, and the rest for breakfast. A truly conscientious person might divide this dough in two and make the equivalent of those little frozen single-sized pizzas – the choice is yours.
Now, imagine just for a moment that you are in the process of making a little pizza, and your friend calls and suggests you go out for dinner. You can freeze an unbaked pizza all-dressed (well wrapped to prevent freezer burn — you can freeze it first and wrap it when it’s frozen if you don’t wait too long) or you can lightly coat the stretched dough with oil and freeze the shell. Either way, the frozen pizza can later go straight into the (toaster) oven just like the kind you buy at the supermarket, only, of course, yours will be unique to you, and MUCH, MUCH cheaper. Did I mention that before?
One Small Pizza
Ingredients
- 1/3 cup warm water
- 1 tsp sugar
- 1 tsp yeast (I prefer the fast-rising “instant” variety)
- ½ tsp salt
- Up to ¾ cup of flour, divided
- 2 tsp olive oil, or vegetable oil
If you don’t do a lot of baking, buy your yeast in the little packets. One packet holds enough yeast for two batches of this recipe.
If you’re dead-set on healthy, you can use HALF whole wheat flour, but not all unless you want a leaden crust. You CANNOT substitute gluten-free flour in this recipe. Gluten free pizza crust is different science, and there are plenty of good options online.

Method
Dissolve the sugar in the water. If you are using “instant” yeast, the water needs to be a little warmer than baby-bath temperature (read the lable). Add the yeast and give it a stir. Let this sit until the yeast starts to work – you will see bubbling. This is called “proofing” the yeast. It’s not strictly necessary with “instant” yeast, but it is absolutely necessary with traditional yeast. Either way, you get better results if you dissolve the yeast before you add it to the flour.

Add the salt and ¼ cup of flour to the yeast mixture and stir for about a minute. The more you stir now, the less you will have to knead later. Salt flavors the bread and strengthens the gluten (the stuff in bread that makes it chewy), but it’s deadly to yeast, so don’t leave it out, but don’t overdo.
When the mixture is pretty smooth, stir in the oil. I like to let the yeast meet the flour before I add the oil, but that’s probably just superstition on my part. For reasons I prefer not to examine, I frequently leave out the oil when making pizza with the kids at school. The dough is less tasty and tender, but still edible.


Add another ¼ cup of flour and stir it in. The dough should start to come together, but will still be sticky.
Have the final ¼ cup of flour standing by. Add enough of it to the dough (about half) to make a ragged, shaggy dough that clears the bowl, but remains fairly soft.


Put some of the leftover flour onto your kneading surface and tip the rough and ragged dough out onto it. Knead the dough (see below if you have never kneaded before) for at least 100 strokes, adding only enough flour to keep it from sticking to the counter. The total amount of flour will vary depending on the humidity of the air, the length of time the flour has been in the canister, how well you measured the water, your tolerance for stickiness – and remember that the dough will become less sticky the more you knead it, so don’t add too much flour too soon.


When the dough is as soft and smooth as a baby’s bottom, form it into a ball and drape a piece of plastic wrap over it, so it can rest while you grate the cheese. It needs to rest for at least 10 minutes, no matter what – the gluten you developed as you kneaded the dough is as tense as you would be if somebody beat you up for 100 strokes, and it needs a chance to relax so you can stretch the dough into a circle.
HOW TO KNEAD: Kneading is the process that develops gluten, turning dough from a lumpy mess into smooth, elastic, wonderfulness. There are three parts to kneading: Push, Gather, Turn. On a flour-sprinkled counter, push and press the dough away from your body with the heel of your hand, stretching it as you do so. Gather it back towards your body with your fingers. Give the dough a ¼ turn. Push. Gather. Turn. Keep going, counting the “push” strokes, if you are counting. Sprinkle flour onto your kneading surface as required to prevent sticking, remembering that the dough will become less sticky the more you knead. Don’t panic and add too much flour on the board. With a small batch of dough, one-hand-kneading is optimal. If you make a big batch, use both hands. Think of the great-grandmothers of times past, who made 10-loaf batches of dough every other day to feed the farm hands. No wonder they had forearms like Popeye.
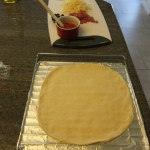
Rested dough will stretch, so you don’t need to use a rolling pin. On the other hand, if you added too much flour and your dough is stiff, then roll away, but remember to add less flour next time. You get to choose how thick you want your crust to be. For me, this much dough makes a thin (but not cracker-thin) pizza about 10 inches in diameter.


The fun part is deciding what you’re going to put on your pizza, and there are no limits here except for quantity. Less is more. Too much topping makes for a soggy crust. Remember when I suggested you store your left-over tomato sauce in table-spoon-sized quantities in an ice cube tray? Two or three cubes should do it.
If you love the flavor of olive oil, and/or you like an unctuous pizza, take time to smear/brush/spread a little over the dough, right to the edges, before you add tomato sauce or whatever sauce you’re using (Ranch dressing? BBQ? Tapenade?). Oil keeps the dough at the edge of the pizza from drying out. If you’re planning to freeze the pizza, oil the dough for sure – it will survive the freezing process better.

I put non-stick foil directly on the rack of my toaster oven, and bake the pizza as close to the bottom element as I can. The foil heats up more quickly than a baking sheet, and I get a nice brown crust.
There is no law that says a pizza has to be round, by the way. Stretching works best for round and oval; if you want square, you’re going to have to push the dough into the corners. Be gentle. Mend tears by pinching.

You can bake your pizza right away if you’re in a hurry. If you’re not, it’s nice to let the dressed pizza rest on the counter at room temperature (lightly tented with plastic wrap if you didn’t oil the crust) for up to about half an hour before you bake it off. Gluten continues to form in the rising dough, enhancing chewy texture. The yeast continues to multiply, making little pockets of CO2 which makes the crust lighter and ultimately crispier. You could stage things this way:
- Make dough, rest it while you select and prepare toppings
- Stretch and dress the pizza; preheat your oven (even if you’re using a toaster oven)
- Let the pizza sit and rise while the oven preheats and you read the paper or have a quick shower
- Bake it off and enjoy, with your favorite TV program
Pre-heat your oven as hot as it will go. I use 450°F on the toaster oven with convection. Bake your pizza until the cheese bubbles and browns to your satisfaction, no more than 15 minutes for a thin crust. Let the pizza rest for 5 minutes before you cut it – it helps to let the contents set up so they don’t slide all over the place as you slice. If you have a pizza cutter, great; otherwise, use your longest knife, or kitchen shears (yes, really).

If you want to use your conventional oven and a pizza stone, go right ahead. “Cook’s Illustrated” magazine recommends pre-heating the stone for an hour for best results, and who am I to refute their scientific testing? You can Google their website for information – it’s a good read. Your pizza will take less baking time if you use a well-heated pizza stone in a big 500° oven with convection (mine took 8 minutes total), but of course you have to factor in that pre-heating time, if delivery-rivalling speed is of the essence. The stone really does give you superior bottom browning.
I always have trouble getting the unbaked pizza from the counter to the pizza stone, even if I sprinkle the back of a baking sheet with corn meal for easy sliding, and do all those other tricks they recommend in recipe books and magazine articles. After enduring several folded failures, I now put my stretched dough onto parchment paper and put the whole thing onto the stone. When the pizza is almost done, I pull out the parchment (just like a magician yanking the tablecloth off the table while leaving the dishes in place) for the last couple of minutes to crisp up the crust.
Now, if you were thinking you could use the same parchment paper trick to cook a pizza on the barbecue, please don’t. Parchment is pretty good up to 450°F, but most closed barbies are capable of achieving much higher temperatures, and that paper WILL burn.


Using the barbecue as a pizza oven is great in the summertime when you just don’t want to heat up the kitchen. Naturally, you can’t put the soft dough right onto the grate — you need a pizza stone or a solid grill to cook on. A standard cookie sheet may warp in the high heat — it’s not a reliable alternative. Crank your BBQ to high, and preheat the stone for at least 15 minutes. Form your pizza on a peel if you own one, or the back of a cookie sheet if you don’t, generously sprinkled with semolina or cornmeal, so it will slide off easily. Keep your crust pretty thin and your toppings sparing — a thick pizza will burn before it’s cooked in the middle. Once your pizza is in the barbecue, don’t walk away — it will cook in minutes, and overcook (as in blacken) in a flash. Experimentation is necessary — you may find you need to moderate your heat settings — but once you get the hang of it, I’m pretty sure you’ll find a way to turn pizza night into an outdoor kitchen party.

One BIG Pizza
This makes one 14-inch pizza with a generously thick base. You can divide the dough any way you want to make any number of smaller pizzas – I often make four pizza shells from this amount.
Ingredients
- The dry stuff: 2 cups flour, 1 Tbsp sugar, 1 tsp salt
- The wet stuff: 1 tsp sugar and 1 scant Tbsp yeast (one little packet is 2 ½ teaspoons, which is enough) dissolved in ¾ cup warm water
- 2 Tbsp olive oil
Food Processor Method:
- Put the dry stuff in the food processor, fitted with the dough blade.
- With the machine running, pour the wet stuff down the feed chute, followed immediately by the olive oil.
- Process for about a minute, until the dough is smooth.
- Depending on the day and how carefully you measured, you may need an extra tablespoon of water, or an extra tablespoon of flour – be ready to adjust. Let the dough blade run for at least 30 seconds before you decide whether you need one or the other.
Form the dough into a ball and let it rest for about 10 minutes before stretching. If you divide the dough, re-roll it into balls and let them rest a bit before making pizza shells.


Stand Mixer Method
- Put the dry stuff in the bowl, fitted with the dough hook.
- Add the wet stuff.
- Run the machine on medium until the dough starts to come together.
- Add the olive oil. Keep kneading.
- Adjust for texture as required – perhaps a little more flour until the dough clears the bowl; perhaps a little bit of water (I have used a spray bottle) if the dough seems too stiff. The dough will become less sticky as it kneads, so don’t overdo additional flour. Total kneading time will be somewhere around 5 minutes.
Cover, rest, stretch, top, bake, etc. etc.

PS –
In desperation, I have spread salsa on a flour tortilla, added salami and sliced cheese, and baked this off in my toaster oven until bubbly and browned. It’s not “real” pizza (as my grandson quickly pointed out), but it’s close enough when you need a really quick fix.
(Photo not supplied — too embarrassing.)


Leave A Comment