


If you believe the advertising, people will buy a commercially produced packet of pre-cooked rice rather than cook their own. I mean really! Years ago it was Minute Rice, and now it’s shelf-stable stuff in a packet or a single serving cup. It’s expensive, it’s over-packaged, and it’s completely unnecessary.
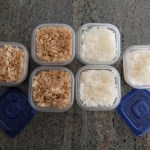
In less than an hour, you can cook up your own rice, put it into those nice little re-useable microwave-safe ½ cup containers or little snack-sized bags, store them in the freezer, and save yourself a bundle. One cup of uncooked rice will yield 5 or 6 half-cup servings.
Want flavored rice? Add whatever you think would be delicious — soy sauce, hoisin sauce, ketchup, dried herbs, lemon zest — stir, package and freeze. If you cook your rice in broth or stock, it will be even tastier. You could mix your cooked, cooled, seasoned rice with frozen vegetables before portioning it up, if that appeals to you, for instant “fried rice” down the road.
A little time invested in making your own, and you have single servings of rice that will reconstitute in the microwave in 1 to 2 minutes, just like the commercial product. Except yours doesn’t have extra salt, or any preservatives or artificial flavorings. And you save a bundle!
Don’t have a rice cooker? You don’t really need one.
Have you been plagued with failures in the past? This is foolproof. Don’t be afraid — it’s really easy!
How to Cook Rice
You don’t need no rice cooker — you ARE a rice cooker!
Ingredients:
1 cup rice
2 cups water
1/2 tsp salt
1 Tbsp butter or oil

Let me just say here that all rices are not the same. This article from Fine Cooking Magazine shows a short but comprehensive list of rice types. For our purposes, I would suggest you choose long-grain white rice. It’s very versatile, and the easiest to cook. If you prefer the flavor of basmati or jasmine rice, you can prepare and freeze them in much the same way as long-grain white, but with a little less water. More on that below.
Domestic white long-grain rice does not need to be rinsed. Imported rice may have been processed differently, and may have stuff on the surface you don’t want to deal with, so give it a rinse under cold running water in a fine-mesh strainer, tapping it firmly to remove any excess.

Choose a pot with a snug-fitting lid. Put 1 cup of rice in the pot. Add 2 cups of cold water, a tablespoon of butter or oil, and half a teaspoon of salt.

Bring the uncovered pot to a full rolling boil. That’s when there are big bubbles everywhere, not just at the edges.
This is the point where you DO NOT STIR. Stirring will liberate starch and make the rice sticky. You don’t want sticky.
Immediately turn the burner down as low as it will go and put the lid on the pot. If your stovetop is electric, have a second burner set on low and move the pot to the low burner.
Set a timer for 10 minutes.


When the timer goes off, move the pot right off the heat entirely and set the timer for a further 10 minutes. Do not take the lid off the pot, but if you have to peek because you’re just too curious not to, do it quickly.

After the second 10 minutes, fluff the rice with a fork. If there’s still a lot of liquid in the bottom of the pot (and there shouldn’t be), you may need to put it back on low heat for 5 more minutes or so. If it seems to be stuck (and it shouldn’t be), add a tablespoon of water, put the lid back on, and wait for another 10 minutes.


Rice will stay warm in a covered pot for quite a long time, but once it’s cooked, don’t hold it for much longer than half an hour. It’s really starchy, and therefore prone to incubating food-borne illness bacteria, if some managed to get into the pot somehow (hand washing –need I say more?). If you are planning to flavor it, do so while it’s still warm so it can absorb ingredients like soy sauce,Worcestershire, or citrus juice more easily.


To make your single-serving freezer batches, turn your rice out into a big bowl to cool it more quickly. The butter or oil in the pot will have lubricated it enough that it shouldn’t be overly sticky. Once it’s close to room temperature, lightly pack it into 1/2 cup containers, put on the lids, and pop them in the freezer. All done!
Alternatively, spoon 1/2 cup portions into small freezer bags, remove as much air as you can (I use a drinking straw and suck the air out), flatten lightly if you wish, and freeze. Try not to man-handle the rice — it’s nicer if you don’t mash up the grains.

Rice Notes:
The 10 minutes low heat/10 minutes covered off-heat method works just fine for all kinds of white rice when you are cooking relatively small quantities, like 1 cup of uncooked rice. The package instructions say “simmer for 18 minutes”. Don’t do that.
Short-grain rice will be slightly sticky, even if you rinse it well. This is an advantage if you’re planning to eat it with chopsticks. Don’t invest in Arborio or Carnaroli rice for daily eating — it’s very expensive, and better suited for risotto. Plain old short-grain works well, as does sushi rice, if it’s on sale.

Basmati rice is traditionally rinsed and soaked. If that’s the way your mother did it, far be it from me to suggest change. I have cooked it up both soaked and un-soaked, and frankly, soaking is unnecessary. Basmati rice does need less water — 1 1/2 cups of water per 1 cup of rinsed, uncooked rice.
It is suggested (on the package) that jasmine rice is also should be rinsed to remove surface starch and ensure a light, fluffy texture. In my kitchen, I only rinse it if it is an imported brand. Jasmine rice needs less water too — only 1 1/2 cups of water per 1 cup of uncooked rice.
Brown rice, on the other hand, is a whole ‘nuther thing, and I will address that in another entry.


Leave A Comment