


I’ll bet there are millions of people out there who have vowed that they are “absolutely giving up bread” for whatever reason they imagine they need to. The fact remains — a bun is the best vehicle for rapidly consuming a meal, whether it’s breakfast on the run, or a “necessity burger” when you’re starving after work.
I, on the other hand, would like to stop throwing buns in the garbage. I bag buns for the freezer with every intention of doling them out in accordance with my requirements, and then forget they are there. When I “discover” them, they are completely dehydrated and freezer burned, and I throw them away. I have absolutely nothing invested in those store-bought buns, except a little money. Frankly, after they have spent time in the freezer, they have pretty much lost their appeal anyway, only good for bread pudding, which I am absolutely not making unless company is coming.
Now, if I make a few buns, I’ll take better care of them because my time and pride is involved. Bread-making is not laborious, nor is it particularly time consuming. The results are completely worth it. The following recipe has an extra advantage: the addition of mashed potato actually prevents the buns from staling as quickly as store-bought bread. The rolls are soft and delicious, and my batch is small enough that you won’t kill yourself with kindness. Even if I have one for breakfast and one for dinner every day for three days in order to use them all up, I don’t think that would upset the apple cart, would it? It would only be a problem if I ate all six in one sitting before they got too cool to melt the butter … which I’ll probably only do once….
Potato Buns
This recipe is lightning-fast when made in a food processor, but just as easily made by hand if that’s the only equipment you have. This is a versatile little dough, great for cheese buns, or pizza buns, or cinnamon buns.
Ingredients:
- 1/3 cup milk (or water)
- 2 tsp yeast (I like to use the fast-rising, instant one; traditional will work too, but the dough takes a little longer to rise)
- 1 Tbsp sugar
- ½ cup mashed potato (leftover, boil one up and mash it, or make it from flakes)
- 1 egg
- 1 tsp salt
- 2 Tbsp butter, melted and cooled
- 2 cups flour, divided into half-cup portions (really – there’s a good reason)

Method:
This is the method for making the dough by hand. Food Processor and Stand Mixer methods follow.
Heat the milk in the microwave for about 20 seconds, so it will be warm enough to dissolve the sugar and the yeast. Add them in and give the works a stir. It’s not particularly important to “activate” the yeast – you just want to dissolve it so it will mix into the bread dough nicely. I find that even “instant” yeast benefits from being dissolved this way.

Combine the egg, mashed potato, yeast mixture, and salt, stirring to break up the egg, and mix everything nicely together.


Add ½ cup of flour. Stir until smooth.


When I’m hand-making bread, I like to introduce the yeast to the flour before complicating the mixture with the melted butter. Perhaps that’s just superstition on my part. Regardless, add the butter to the batter and stir it in.


Add the second ½ cup of flour. Stir with vigor. The more stirring you do here, the less kneading you will have to do later.


Add the third ½ cup of flour. Although the dough is still pretty soft, you’re not going to be able to completely incorporate the flour by stirring. Stir just enough to create a ragged, flour-covered dough-ball, and then tip it out onto the counter, along with all the loose flour.
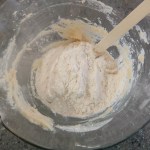

The dough is quite soft, so use a light hand, or you will be wearing it like a big, messy glove. Begin to knead (finger tips first; then gather with your fingers, push the dough away with the heel of your hand, turn 45°, repeat), working in all of that third half-cup of flour.


The dough will still be a little sticky when you have worked in that third addition of flour, but here’s the thing: how much extra flour you add now is not accurately predictable. Dry flour on a dry day will mean you need very little. A humid day, a larger egg, or generous measuring of either milk or butter will mean you need a little more. Here’s what I do: I sprinkle about a teaspoon of flour at a time onto my kneading surface, and knead the dough about 20 times, or until the flour is absorbed and the dough is starting to stick to the counter again. I repeat this process until the dough is lovely and smooth, still quite soft but no longer sticking to the counter, and I have kneaded somewhere between 120 and 150 strokes – so somewhere between 5 and 7 additional teaspoons of flour on average.


Kneading is very therapeutic. It’s good for your hands and forearms, and it’s nice and restful for your brain. Treasure these found moments.
If you add too much flour at this point, and the dough becomes very stiff, your buns will take a long time to rise. Try to keep that dough fairly soft. If you’re a first-time breadmaker, be kind to yourself – developing “the touch” takes practice.
Food Processor Method
If you’re making your dough in a food processor, use the dough blade if you have it, or the metal blade if you don’t, and put everything in the bowl, including the last teaspoons of flour (a total of about 1 ¾ cups of flour).
The dough should still be soft, but it shouldn’t stick to the sides of the processor bowl – add a little extra flour down the feed tube if it seems to need it (pun fully indended).
It is entirely possible to overwork dough in a food processor – begin by pulsing to combine the ingredients, and then you’ll only need to run it for a minute or so. I think I mentioned lightning-fast, didn’t I? It takes longer to measure the ingredients than it does to mix them together and knead them.


Stand Mixer Method
I don’t have any photos of this, because I haven’t used my stand mixer since I got my really big food processor. Nevertheless —
Following the advice above, put all the “wet stuff” in the stand mixer bowl, and mix it up with the paddle attachment. Add half the flour, and mix until you have a smooth batter. Scrape off the paddle,change to the dough hook attachment, and add the rest of the flour. Mix until the dough forms a ball the clears the sides of the bowl. Don’t panic if it seems sticky — let the machine do the work for at least a couple of minutes before deciding whether or not you need to add additional flour, a scant tablespoon at a time. When the dough is nice and smooth (about 4 minutes later), you’re ready to proceed.
All methods, Continued
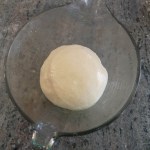
No matter how you made your dough, round it into a nice ball, and give it a little spritz with non-stick spray, or a light coating of oil or butter. Put it into a greased bowl that will still contain it when it has doubled in volume.

In the olden days, the bowl would be covered with a dampened tea towel, which would provide a humid environment while the dough rose, and this still works very well if you have resolved to cut down on your use of plastic wrap. I haven’t made that resolution. Leave your covered dough in a quiet, warmish place (on top of the fridge, or near the stove) and go do something else for half an hour to an hour, depending on how warm your rising place is.


If your dough doesn’t double in size in an hour, either the environment was pretty cold, or your dough was pretty stiff (or perhaps your yeast was dead – did you check it’s “best before” date?) Give it another hour before you abandon it as a lost cause. When I was a girl, we would let the dough rise in the turned-off gas oven, where the temperature and humidity was perfect thanks to the warmth of the pilot light. No pilot light now, sadly. You can give your dough a boost by putting it in the microwave for a minute on the absolutely lowest power setting.
If you need to slow things down, perhaps because you have time to make the dough in the morning, but no time to bake it off until evening, you can let the first rising happen in the refrigerator. Make sure it’s well covered. If you have time, check it in an hour, and “punch it down”, meaning deflate large gas bubbles by giving it a quick knead, then return it to its covered bowl.
Perhaps you want fresh bread for brunch with your friends – you can make the dough Saturday evening and pop it in the fridge, then form your buns first thing on Sunday morning (the cold dough will take a couple of hours to warm up and rise), and pop them in the oven when your company is on the doorstep. The buns will bake while you hang up the coats and enjoy that first mimosa, et voilà — freshest bread possible. What a star you are!
When your dough has doubled, it’s time to form the buns. Flatten the dough and divide it into six pieces. If you’re really detail-oriented, you can weigh the whole piece of dough, do the math, and divide it accurately into six portions. If close is good enough, do it by eye. Sixths make perfect hamburger-sized buns, or hot dog buns.


Take each piece and roll it into a perfect ball. How? Make your hand into a cage over the dough ball (often called a spider, ‘cause that’s what your hand looks like) and make circles with your fingertips on the counter. The dough will roll loosely under your hand against friction from the counter, and make itself into a sphere. Ta-da!


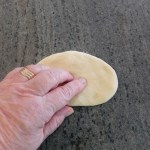
If you want hamburger buns, flatten each dough-ball until it’s about half an inch thick. You could brush them with egg wash and sprinkle them with sesame seeds if you’re Martha Stewart…
Hot dog or hogie rolls? Flatten the dough into an oval, roll it up, pinch the seam and tidy the ends.


Space your buns evenly on a parchment-lined or silpat-lined or lightly greased baking sheet. Give them a little spray of non-stick or oil, or oil a piece of plastic wrap and cover them up. Leave them alone for 15 minutes to half an hour, or until they have nearly doubled in size.


Bake in a pre-heated 350°F oven for 20 to 30 minutes (depending on the size of the buns), or until golden brown all over (not just on the top). If you under-bake, they will be raw in the middle. If you over-bake, they will be too brown, and dry. Keep an eye on them.
I made two dinner rolls, three hamburger buns, and one hot dog bun.

Try not to burn your mouth when you do your “quality check”. I speak from experience.
I made the dough into cheese buns for this picture.

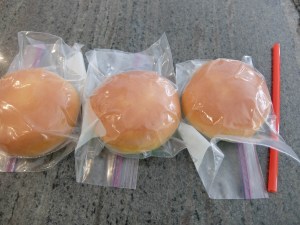
For storage, I recommend devoting a set of zip-lock bags to buns, so you can re-use them without washing. I use a straw to suck out as much air as possible. I pack my buns individually, so I minimize the “taking out and putting back” process you have with a communal bag in the freezer, which seems to cause a certain amount of wear and tear on the contents.
And I usually only have about 2 buns to store anyway — because they’re SO GOOD when they’re fresh, and they stay fresh for two days on the counter. Don’t store them in the fridge, by the way. Google “staling” for the reasons why.


Leave A Comment