


Brined Turkey Breast Roast
Turkey breast is my favorite part of the bird. I know, I know – the dark meat is where all the flavor is, because it comes from the working muscles of the bird. I don’t care. I like the white meat, especially if it’s juicy and accompanied by traditional bread dressing and quite a lot of really good gravy. And, of course, turkey sandwiches are the best ever – who doesn’t like a turkey club? I can have all those things any time I want – I don’t have to wait for Christmas or Thanksgiving or anything, because whole turkey breasts are available all year round, sometimes in the grocery store and always at my favorite butcher.
If you’re trying to cut down on processed luncheon meats, cooking a turkey breast is a good way to start. It’s easy to do, freezes well, and it’s a good source of lean protein without a whole lot of salt. Great addition to salads, too! Now that I have a smoker (thanks, boys), I can brine and smoke a turkey breast for days of good eating.
A word about brining. When you season the outside of a piece of meat and then immediately cook it, that’s where the seasoning stays – on the outside of the meat. Marinating does a good job of flavoring the outside as well. Brining, on the other hand, draws salt and water into the meat, where it stays as you roast or pan-fry, giving you a moist, well-seasoned end product. Brining is a good thing, but it’s not an essential thing. I have been roasting turkey and chicken breasts (and pork loin roasts, for that matter) without brining for a long time, and I find that if you buy a good quality piece of meat, AND roast it only until it reaches the magic temperature, AND rest it properly before carving or serving, you can have lovely results without brining. The experts at Serious Eats (Click Here) can give you all the detailed information you want.
In keeping with my “Turkey Series”, here are instructions for brining and tying two turkey breasts together to form a nice little roast. If I am doing a big turkey dinner, I break down a bird two days before the big event and make stock. The day before the dinner, I brine and tie the breast roast, and braise the legs, thighs and wings. The day of the dinner, I roast the breast meat, re-heat the braise, and make gravy. Planning is everything if you want a non-hectic Turkey Day.
Don’t forget to make cranberry sauce.
Brined Turkey Breast Roast
The brine:
1 cup water
30 grams salt – Kosher salt is often preferred because it has no iodine in it. Sea salt will do nicely. If you don’t have a scale, it’s about 2 Tablespoons of Kosher Salt, 25% less of fine sea salt, because it’s denser.
1 Tbsp sugar
3 cups cold water or ice
Additional flavoring ingredients: a cup or so of mirepoix (2 parts onion, 1 part carrot, 1 part celery, all nicely diced), black peppercorns, bay leaf if you have it, fresh or dried whole leaf “Poultry Herbs” (sage, thyme, rosemary). These ingredients DO add some nice flavor to the turkey, but not a whole lot. The brine is the important part.


The turkey:
2 turkey breast pieces, skin on if possible. I cut mine off a 12-pound turkey.
You can order pieces from the butcher, or ask for them at your grocery meat counter (they don’t always stock turkey breast, but they can pretty much always get them if you want them). You can prepare a single turkey breast this way just as easily. Leave the skin on if you can – there’s a nice layer of fat under it that will do a terrific job of keeping the roast flavorful and moist.


Method:
Heat 1 cup of water, and dissolve the salt and sugar in it. Top it up with 3 more cups of cold water.
If you’re not in a hurry, refrigerate the brine for an hour so it’s really cold.
If you ARE in a hurry, add ice instead of water to make 4 cups of brine in total, and it will be cold enough right away. It’s VERY important to brine cold turkey pieces in cold brine, to avoid bacterial growth that can make the whole project a food-borne-illness nightmare later on.


Put your whole, washed, turkey pieces in a zipper-closure bag in a pan (to catch any drips), or right in a container with a lid that will accommodate the turkey, the additional flavoring ingredients, and enough brine to submerge everything completely. Put everything in the fridge and leave it there for 24 hours.
This is a low ratio brine, meaning there isn’t a whole lot of salt in it. I prefer a longer brine in a less-briny solution for the flavor I’m seeking. You can Google shorter brining times in stronger solutions if you’re pressed for time and don’t mind a saltier outcome.


Next day, discard the brine and all the other stuff, and pat the turkey pieces dry.
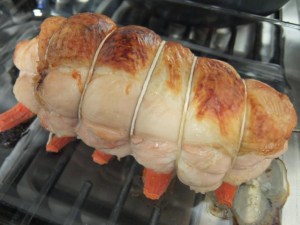
A recent Cooks Illustrated article on making a pork tenderloin roast recommended roughing up the surfaces that would be placed together, to form a bit of a protein bond. You could apply the same principle to the turkey breast pieces — just run the tines of a fork across the cut surface a few times to rough it up. Then, place the pieces top-to-tail with the roughened surface inward and the skin still on (if possible). Tie them together with kitchen string (cotton) to form a neat little roast with a fairly uniform diameter.
If you’re preparing a single turkey breast, you don’t need to tie it, but it makes a nice, compact presentation if you do. It roasts a wee bit faster if you leave it flat.
A double-wrap on the first knot prevents slipping when you tie the double knot. Trim the extra string ends before roasting.


For nice even cooking, it’s good to place the roast on a rack. If you don’t own a roasting rack, cut a few peeled carrots in half lengthwise and set them into your roasting pan to keep the turkey from sitting on the bottom. If you have extra celery stalks, those work well too.
Put your roast into a pre-heated 350°F oven. There are all kinds of roasting temperatures and methods (hot start, cool finish, or all day at a low temperature), but a nice, even 350°F works well for this particular roast (mine took about 2 hours), and lets you multi-task, like baking a casserole of dressing or scalloped potatoes while the roast takes care of itself.


Using a regular meat thermometer, starting checking your roast at the 1-hour mark for a double, or the 45 minute mark for a single breast. Test into the middle of the thickest part of the meat, looking for 160°F. Be aware that the oven temperature drops every time you open the door to check the temperature, so don’t be too anxious or it will take forever to get the job done.
A probe thermometer is VERY useful piece of equipment, and if you don’t own one, you should buy one. Stick the probe into the roast horizontally, positioning the tip of the probe so it is in the middle of the thickest part of the roast, whether you’re doing a double or a single breast. Set the desired finished temperature to 160°F, and let the equipment do the worrying.

It’s VERY important to let your turkey roast rest for at least 30 minutes under a foil tent at room temperature. The internal temperature of the roast will continue to rise to the perfect doneness of 165°F as the turkey rests. The resting time also gives the meat juices a chance to thicken up a little, so they stay in the meat, rather than flooding the carving board.
When I’m doing my plan-ahead turkey feast, this white-meat roast is the only thing I cook on the big day. I warm up and set out the rest of the buffet items while it’s resting, and carve it into slices last thing before calling my guests to dinner. In my home, we toast the occasion or say Grace before loading our plates at the buffet, so everyone can start eating while the food is still warm. It’s not Norman Rockwell, but it works for me.
When it’s not holiday feast time, I cool the roast at room temperature for 30 – 60 minutes, and then cool it completely, loosely covered, in the refrigerator. If I’m not planning a marathon turkey sandwich week, I double wrap pieces of the roast in plastic and tuck them in a freezer bag, to slice and use on future occasions.

…like turkey noodle soup…
…or a tasty Turkey Club Sandwich.
Carefully stored in the freezer, you can space out your enjoyment of turkey leftovers for six months, instead of having turkey leftovers every day for weeks (unless, of course, that’s your idea of heaven).


Leave A Comment